


Custom fields in WordPress are a versatile and powerful feature that allows you to add additional data or metadata to your posts, pages, and custom post types.
They are key-value pairs that can be associated with individual posts, pages, and products that provide a way to extend the default content structure.
Enabling the default WordPress custom fields with WooCommerce can be very beneficial for displaying additional data and product information.
This tutorial will show you how to add and display the default WordPress custom fields in your WooCommerce store.
Why Use Custom Fields with WooCommerce
As mentioned above, custom fields will allow you to add extra information about the products to your customers.
Transparency is vital between the store owner and the customer relationship.
One way to be transparent is by laying out and presenting all the information about the products.
In addition, minimizing the visitors’ questions and support tickets is another excellent advantage of using custom fields with WooCommerce.
Every eCommerce shop owner should aim to provide customers with the most straightforward and quickest sale process; displaying all the relevant information is a significant step in that direction.
Think about it that way: if some data is missing from the products’ pages, your store’s visitors interested in purchasing the product will need to contact you first to clarify. When you respond, they have already left your store or bought it from your competitor’s website.
Adding custom fields to products efficiently smooths the selling funnel and helps customers make better decisions.
How to Enable Custom Fields in WooCommerce
WordPress custom fields are already enabled for WooCommerce products by default.
Although they are not presented on the page, they are still enabled. We will need to toggle the option to display them.
To do that, navigate to any product page, click the Screen Options tab, and check the Custom Fields box.
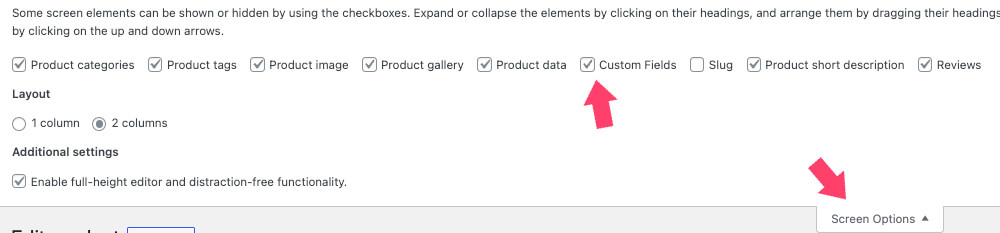
Once checked, scroll down under the product’s description section to see the custom fields area.
Note: sometimes, you must refresh the page after enabling the custom fields box to see the section.
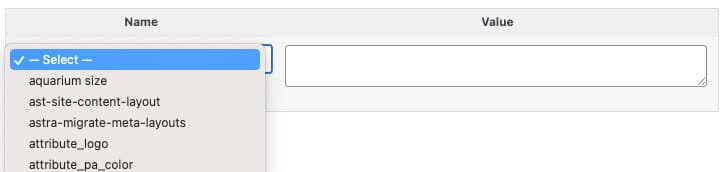
To add a field, choose your desired key name option from the drop-down list on the left, enter its value in the value field, and click the Add Custom Fields button.
To add a custom field, click Enter new, set your custom name and value, and click the Add button.
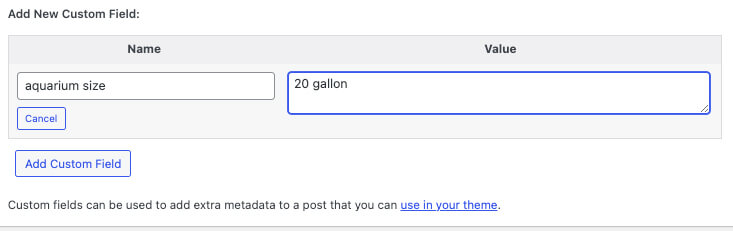
After adding the custom field, click the Update button to save its values in the database.
Adding custom fields to WooCommerce is the first step out of a two-step process. Next, we should display the custom fields on products’ pages and make them available to our visitors.
How to Display Custom Fields in Product Pages
There are three ways to display the custom fields on WooCommerce product pages:
- In the theme’s file with a PHP function.
- Using WooCommerce hooks.
- With shortcodes.
- Using a page builder, such as Elementor.
Whatever way you choose will do the job right, and selecting the method is based on your preference.
In the Template File
You can display custom fields on any page, post, or custom post type. Because this article focuses on WooCommerce, we will use the product template file.
Often, WooCommerce uses the single.php file to generate the product pages, and we can access that file by using an FTP or straight through the theme file editor screen.
However, based on your theme, there may be a dedicated template file for WooCommerce products instead of the single.php one.
I recommend you first paste the code in the single.php file and verify it’s working. If it doesn’t work, Google which template file your theme uses to generate the product pages and paste it there.
So, paste the function below in the desired location inside the template file:
<?php echo get_post_meta($post->ID, 'key', true); ?>Make sure to replace the KEY value with the actual name of the custom field.

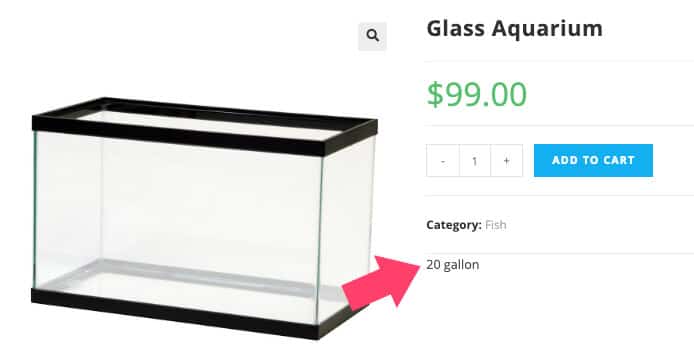
Once saved, visit the product page that contains this field and verify that it is displayed on the screen.

Depending on your needs, you can add some text before or after the field like so:
<p>Text before <?php echo get_post_meta($post->ID, 'aquarium size', true); ?> text after</p>
The fields will be displayed on every product page, regardless of whether it contains it. To show it only on product pages that have the field, use the condition function below:
<?php
 if(get_post_meta($post->ID, 'key')){ ?>
 <p>Aquarium size: <?php echo get_post_meta($post->ID, 'key', true); ?></p>
<?php } ?>
Remember to change the key attribute with the actual custom field’s name.
WooCommerce Hooks
WordPress hooks are another helpful way to add content to some page parts.
Inserting content through hooks saves us from modifying the store’s templates, and by doing that, it simplifies the process.
WooCommerce has many hooks throughout the product page, and you’ll need to choose the desired one based on where you would like to display the data.
Please paste the hooks’ functions in the functions.php file of your child theme. Make sure to back up your WordPress website before you modify its core files.
function display_custom_field_woocommerce() {
global $post;
?>
<p><?php echo get_post_meta($post->ID, 'key', true); ?></p>
<?php
}
add_filter( 'hook-name-goes-here', 'display_custom_field_woocommerce' );
Remember to change the hook-name-goes-here with the actual WooCommerce hook and the Key with the exact custom field name.
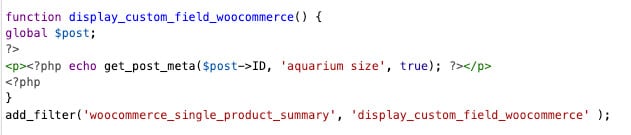
Like the method above, you can also add a condition to check if the custom field exists before printing its value into the page.
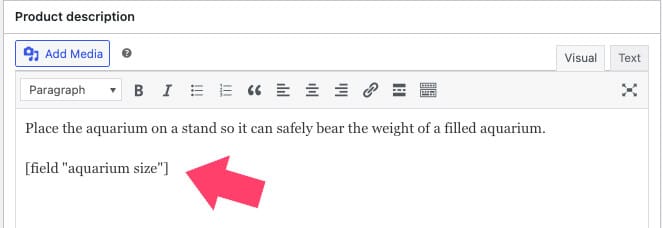
With a Shortcode
Shortcodes are one of the easiest and most common ways to display data on a page; therefore, we all love them.
Using shortcodes provides us with complete freedom of where we would like to display it by using Gutenberg blocks, classic and code editors, and page builders.
There is no option to display custom fields with shortcodes, but we can add a simple code to create it.
To do that, copy the code below at the button of the functions.php file of your child theme and save the changes.
// display custom fields with shortcodes
add_shortcode( 'field', 'shortcode_field' );
function shortcode_field( $atts ) {
	extract( shortcode_atts( array(
		'post_id' => null,
	), $atts ) );
	if ( ! isset( $atts[0] ) ) {
		return;
	}
	$field = esc_attr( $atts[0] );
	global $post;
	$post_id = ( null === $post_id ) ? $post->ID : $post_id;

	return get_post_meta( $post_id, $field, true );
}
Then, edit one of your product’s pages and use the shortcode field to display the desired custom field. Remember to change the text with the actual custom field name.
Once saved, visit the product page to ensure the custom field value was successfully added.
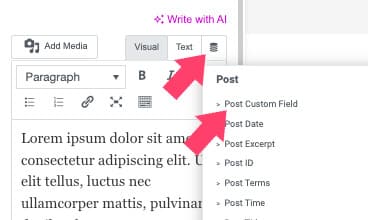
Elementor Dynamic Data
Page builders were made to make our designing life more accessible, and they managed to do it in this case once again.
Because most of us use a page builder, such as Elementor Pro, displaying custom fields may be the easiest, especially when building the product page with their theme builder feature.
Click on Edit with Elementor to open the single product template page and drag a new Text Editor widget into your desired location.
Then, click the Dynamic Tags icon and choose the Post Custom Field option to replace the default static content with the custom fields.
Enter the custom field name in the Custom Key value and verify that the content is being displayed on the screen.
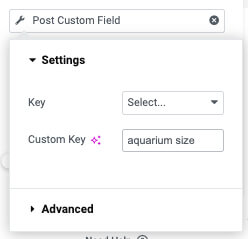
You can also add text to appear before and after the field value. To do that, click the Advanced tab and add your desired text.
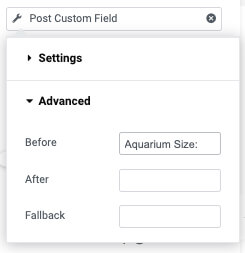
Save the changes again, and visit the live product page to see the content.
WooCommerce Custom Fields Plugins
Adding the native WordPress custom fields option to WooCommerce is one way out of many to display custom fields.
Plenty of dedicated plugins help you achieve more accurate results without using codes.
In one of our other posts, we showed you how to use a plugin to add custom fields to the WooCommerce checkout page and let customers fill them in before completing a purchase.
Other well-known plugins to add custom fields to WooCommerce are Custom Fields for WooCommerce, Advanced Custom Fields, and Admin Custom Order Fields. You can find them, and many more, in our store.
Each plugin has pros and cons; you can test them to determine which fits your needs.
Conclusion
This article showed you how to add custom fields to WooCommerce product pages.
The more information, the merrier, and providing your customers with all the data will simplify and speed up their decision to purchase.
In addition, it will save you hours of valuable time responding to support questions, which you can use to improve your store in other ways.
Also, make sure to subscribe to our YouTube channel and like our page on Facebook.


Thanks for this very detailed explanation of all the custom field display options. Do you know if it’s possible to quick edit custom fields for products in the admin area, or how to display a custom field column in the product list of the admin dashboard?