Shipping products is a significant part of our online business expenses. Undercharging customers for the shipping will bite our profit because we will need to pay the gap.
On the other hand, overcharging shipping costs may cause visitors to leave our website and buy products from competitors who offer better shipping costs.
Some products in our store are different from each other in their size, weight, and classes, and therefore, their shipping costs will change accordingly.
The eCommerce shop owners should charge different shipping costs based on the products’ differences and needs to be fair for our customers and us.
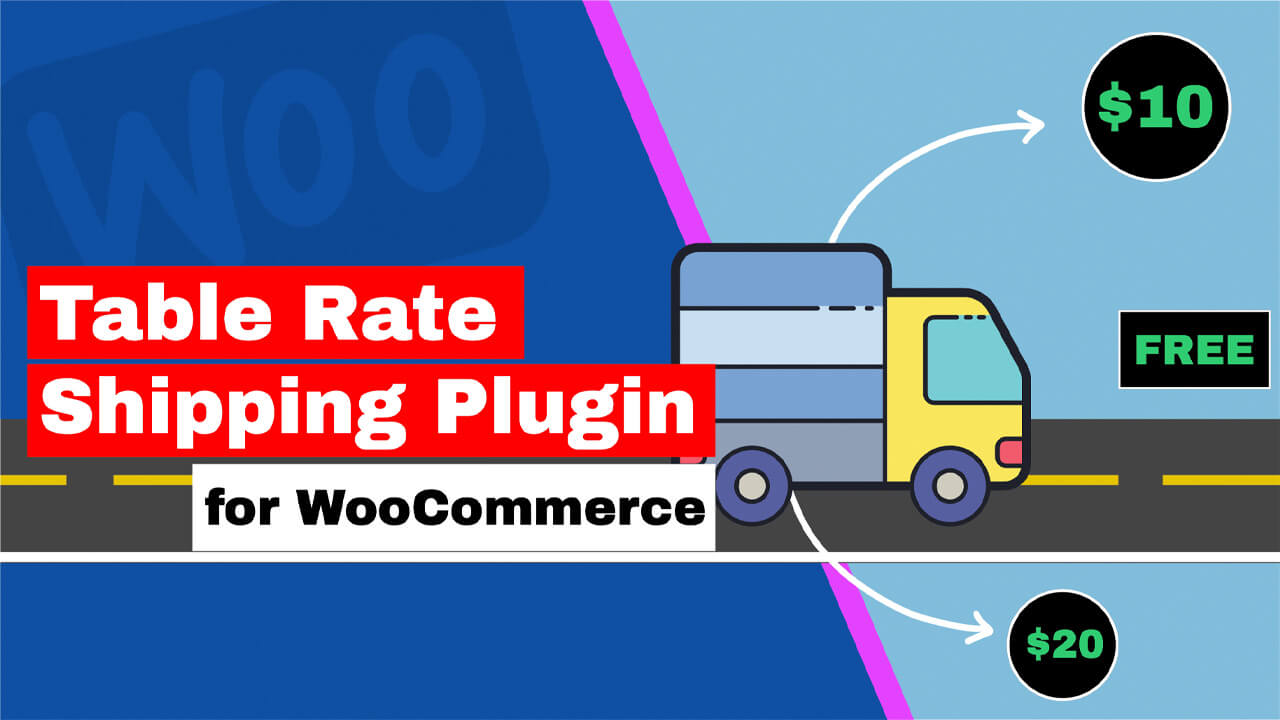
In this article, you’ll learn how to set different shipping costs with the table rate shipping plugin for WooCommerce.
When to Use Various Rate Shipping
While most stores ship similar products in their size and weight, it is not the case for all of them.
Let’s say, for example, that your store sells coffee mugs. Although coffee mugs can come in various sizes, it is safe to assume that each size can fit inside a small shipping box. Different rate shipping is unnecessary, and you can get it by charging a flat rate shipping.
Now, I’ll show you when multiple shipping prices are necessary with a different example.
Let’s assume now that your eCommerce shop sells foods. Some of the food is boxed and have a long shelf-life, while other food is fresh and needs to be delivered on the same next day.
The different food items should determine the shipping method. A can of bean can be shipped low priority, while fresh food should be shipped overnight.
The different shipping ways mentioned above will have additional charges for your customers, and your cart should reflect it.
So let’s jump right into it and learn how to create table rate shipping.
How to Use the Table Rate Shipping Plugin for WooCommerce
The first step is downloading and installing the WooCommerce table rate shipping on our WordPress website.
We can get the plugin from the official website for the total price of $99 or from us for only $4.99.
Once you activate the plugin on your site, before using it, let’s first decide what we want to achieve.
An excellent example to mimic can be taken from the Josh’sFrogs website. This online pet shop website sells live and dry products with different shipping rates. Therefore, a water bowl will require another shipping method than a live lizard and will be much cheaper.
At the header, they’re offering free shipping on dry merchandise when the cost exceeds $100 or on live when over $300.

That’s an excellent example for us to use, and we will learn how to do it now.
Three steps accommodate the process:
- Add shipping classes.
- Set shipping zones.
- Create the table rate shipping.
We will start with the first step by creating shipping classes.
Step #1: Create shipping classes
We will need to differentiate between different products and assign other shipping classes in this first step.
From the WooCommerce admin screen, navigate to Settings -> Shipping -> Shipping classes and click on the Add shipping class button.

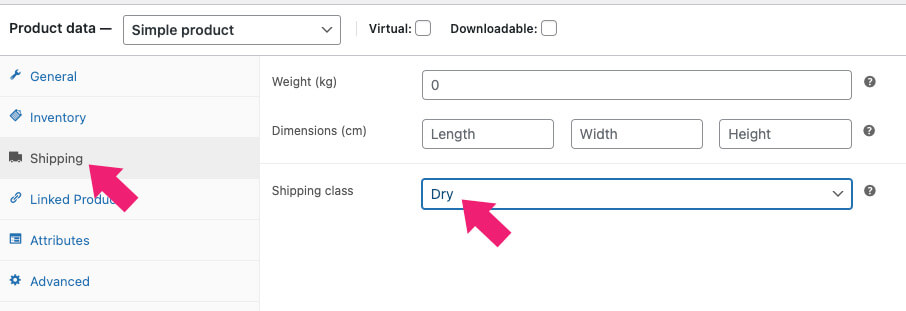
We need to create two shipping classes, the first one we will call Dry and the second one Live.

Once we save the shipping class, navigate into our water bowl product and change its shipping class to Dry from inside the shipping tab.
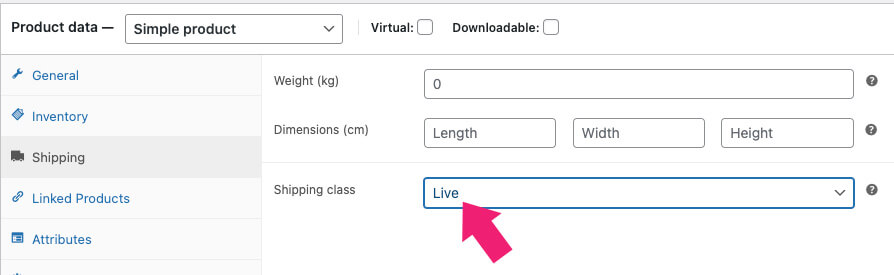
Then, we will navigate into our lizard and change its shipping class to Live from inside the shipping tab.
Once we save both products, we can move on to the second step and create shipping zones.
Step #2: Set shipping zones
This second step will create shipping zones and decide where we would like to ship our products.
You can ship to any zone, but I’ll only create one shipping zone to simplify the process in our example.
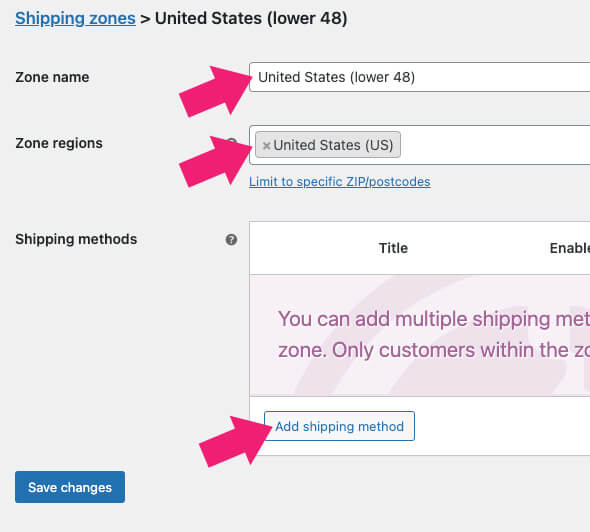
Navigate to WooCommerce shipping zones and click on the Add shipping zone button.
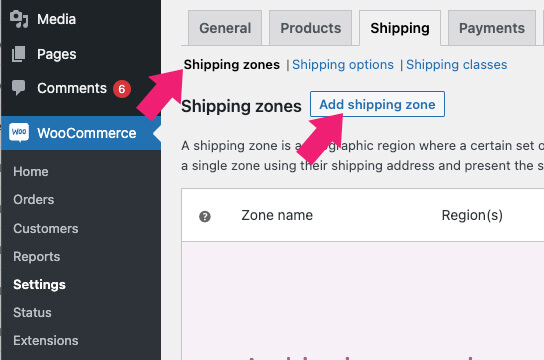
Fill in the zone name field. In our example, I’ll call it the United States (lower 48) and choose it from the zone regions drop-down list. Once selected, click on the Add shipping method button when done.
Select the Table rate option and click on the Add shipping method inside the popup window.
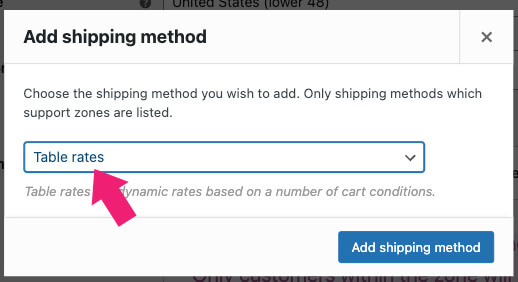
Once created, the popup will close, and the table rate option will be added to the shipping zone.
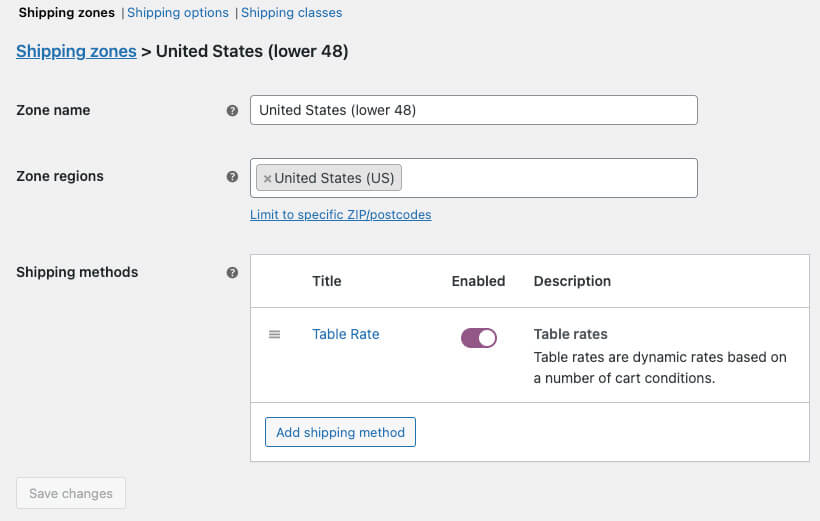
Now, hover on the table rate, click on edit, and move to the next section.
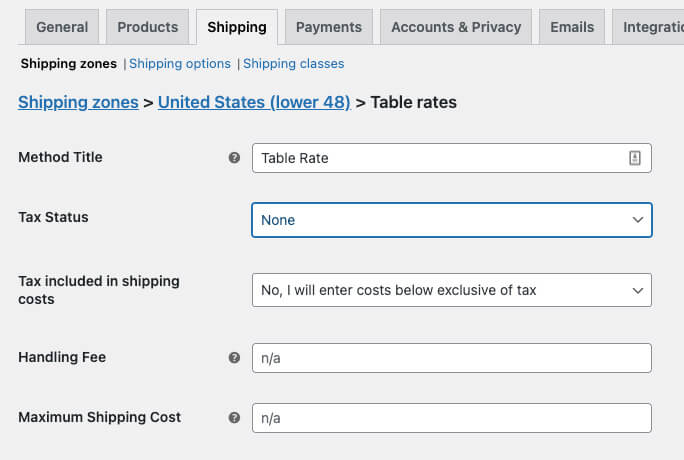
Step #3: Edit the shipping rate table
In the table rate shipping plugin screen, we will find many different options to accommodate every kind of business.

I’ll keep it simple as possible to make it clear for most, but you’ll need to fit it to your business requirements.
The default method title field is set to table rate, but you can change it to a custom name. I’ll leave it as-is.
However, I will change the tax status from taxable to none to keep the numbers low and easy to understand.
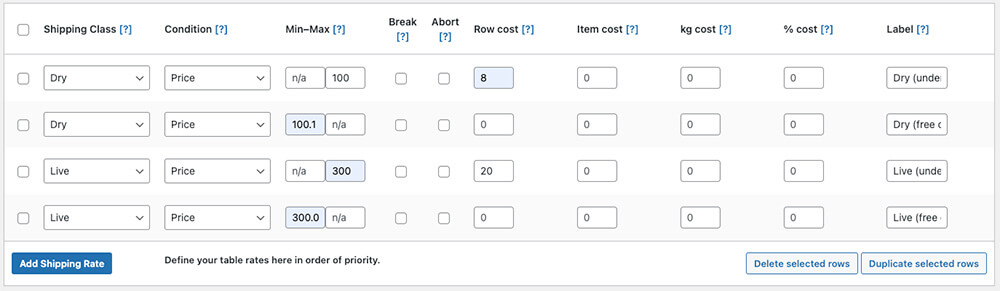
Then, scroll down to the Table Rates section and click the add shipping rate button.

We will need to create the following rates:
- Dry goods will cost $8 to ship (free for over $100).
- Live goods will cost $20 to ship (free for over $300).
We will need to create four different shipping rates for dry goods and two for live goods.
Change the shipping class to Dry and set the max number to 100. Then enter the row shipping cost to 8 and label it Dry (under $100).
Then, create another row, set its class to Dry again, set the minimum price to 101.01, and the row cost at 0. Finish by labeling it Dry (over $100).
You will need to add two similar lines for the Live goods and change the numbers accordingly.
The result will look like this:
Once done, click on save changes and move on to the next step to verify it’s working correctly.
Step #4: Test the table
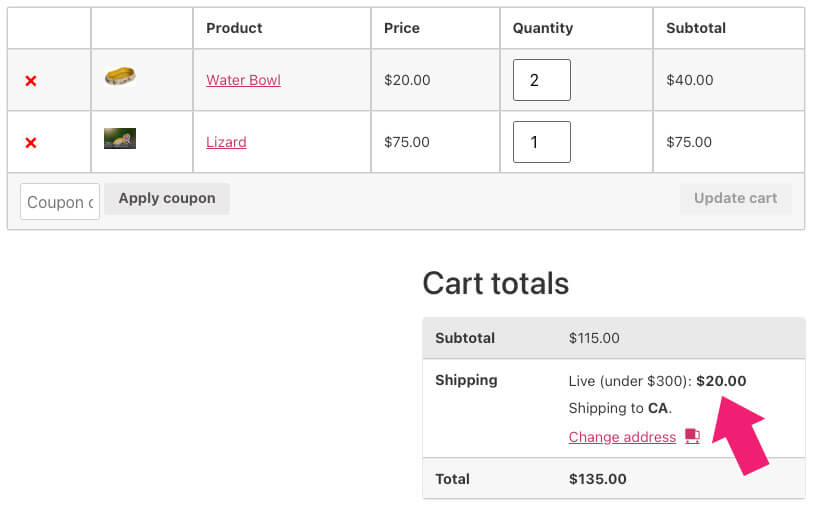
In this step, we will add some products to the cart and verify that it’s reflecting the different shipping rates and conditions we set above.
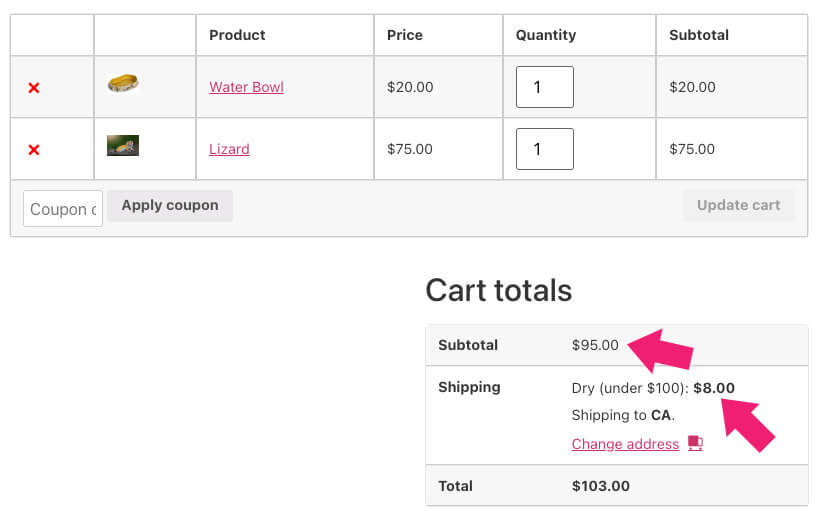
First, add the lizard and the water bowl to the cart, and visit the cart page.
Because both products’ values are less than $100, it should charge the customer the shipping cost.
Increasing any of the products’ quantity will exceed the $100 markdown we set for the dry food and reduce the shipping rate to 0.
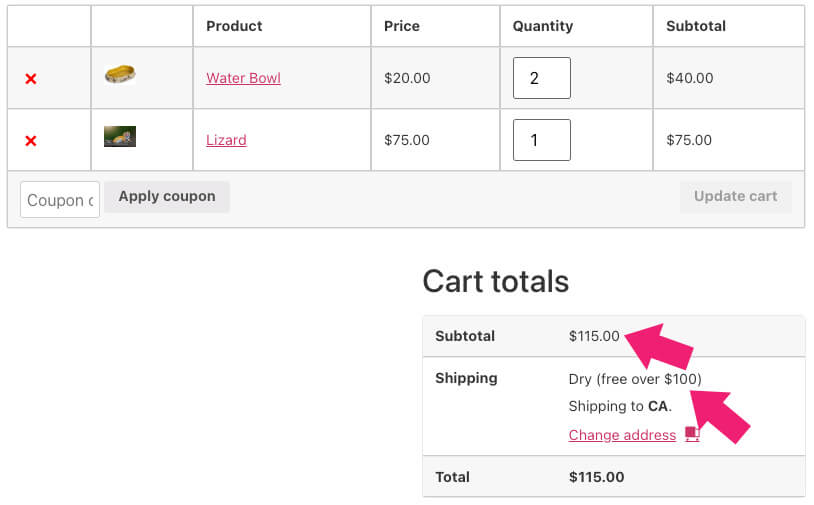
That is good in how the cart responds to the conditions we created. However, it still undercharges the customer for the overnight shipping of the live class.
We must adjust our table if we would like to charge the higher amount for the two shipping rates or calculate the shipping per class.
Table Rate Shipping Extra Options
Class Priorities
Back to our example above, increasing the quantities of one dry or live product in the cart will be enough for the customer to pass the first $100 threshold and receive free shipping.
It’s not always ideal because the shipping rate of the live class is over double that of the dry type. In that case, it will be wiser to charge the higher shipping rate for the two.
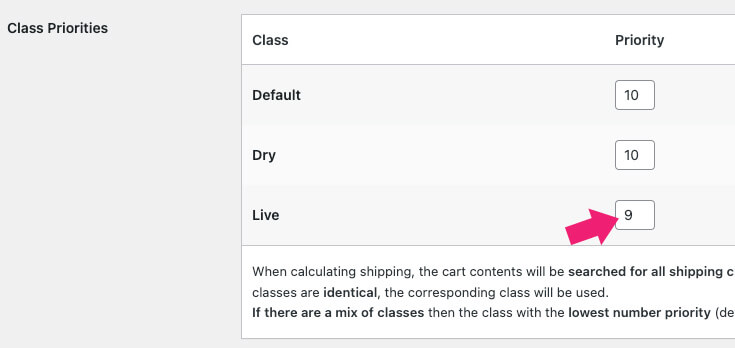
Navigate to the table rate plugin’s screen and scroll down to the class priorities section.
When all shipping class priorities are equal, the cart will reflect the class rate at the top of the list, which is the default because we don’t have a default item in the cart, so that it will move down the list to the second class, the dry option.
To charge the higher number of the two, we will need to change the priority of the live class. The class with the lowest number of priority will be used.
Therefore, change the priority number of the live class to 9 and save the changes.
When refreshing the cart page again, we noticed a higher shipping rate.
For some store owners, it’s an excellent solution to send both packages in the same box and charge only for the shipping of one.
However, what if you need to ship it in two different boxes or from other locations? Then you may want to calculate the shipping rate based on each class instead of the order total. We will learn how to do it next.
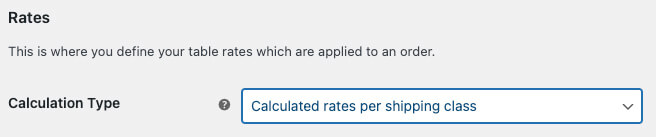
Calculation type
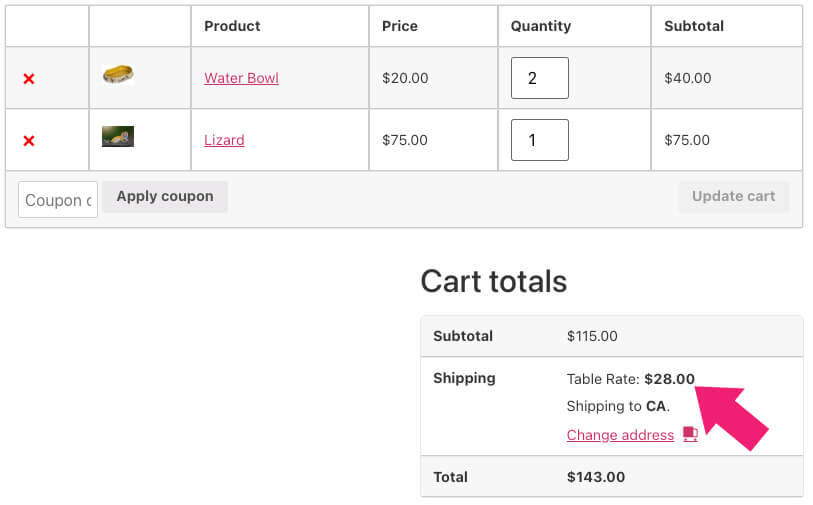
As the picture above shows, the customer will need to pay the shipping rate of the live item but will enjoy free shipping on the dry one, although the dry goods didn’t exceed $100.
That is because we set the live shipping rate to higher priority, and we’re using the total amount of the cart to meet the conditions.
If you would like to change that and force the cart to reflect the shipping costs based on each class, change the calculation type to calculated rates per shipping class.
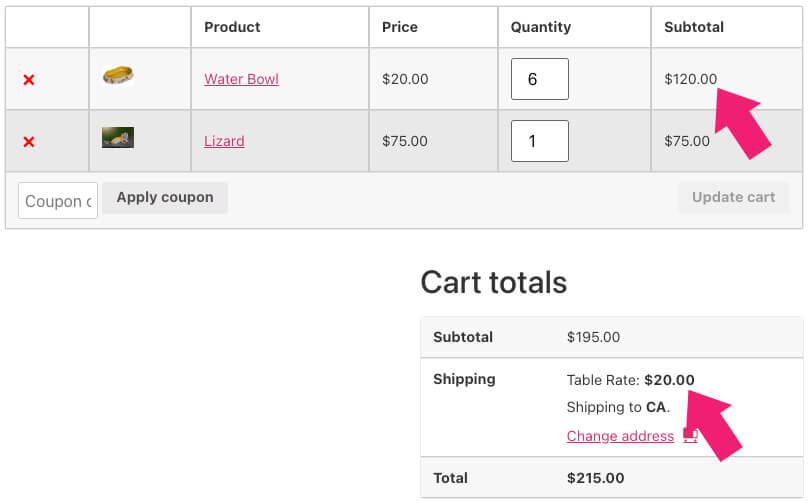
Once you have saved the changes, refresh the cart and notice that it will now charge shipping for the live and dry classes individually.
When changing the product quantity inside the cart to exceed one of the thresholds, the shipping rates table will adjust accordingly to reflect the right amount.
Now go ahead and add shipping zones and classes in your WooCommerce shop.
Conclusion
In this tutorial, you learned how to use the excellent table rate shipping plugin for WooCommerce to set different shipping costs.
Leave us a comment and tell us if you have any questions about the process.
Also, make sure to subscribe to our YouTube channel and like our page on Facebook.