The WordPress dashboard is an excellent way to manage your website. It enables you to build exceptional sites without needing any coding ability. However, it has its limitations.
When you want to disable a plugin or edit a theme or a particular file, using FTP (File Transfer Protocol) can be the most straightforward and most direct solution.
It lets you upload files straight from your computer onto your WordPress website. No need for the dashboard — which is super handy if it’s in maintenance mode or you’re locked out of your account.
This guide will show you how to access FTP and use it to make quick and easy changes on your WordPress site. As well as explaining how to do it, we’ll also look at why you might need to use an FTP WordPress connection.
OK, let’s get started.
What is FTP?
FTP — short for File Transfer Protocol — is one of the most tried and true ways to transfer files online.
If you’re asking the question, “what is a protocol?” let us explain. A protocol is a term used in networking circles to define the rules that allow two different systems to communicate. Data gets broken into little chunks, and you need the sender and receiver to “speak the same language” so the information can be reassembled accurately.
In FTP and WordPress, we can just think of a protocol as a handy way of transferring a file from one system (your computer) to another (your website hosting website). And that is precisely what an FTP WordPress connection will allow you to do.
If you have a website, it will have an FTP server. When you want to communicate with it (without using the WordPress dashboard), you must access an FTP client and connect it with your website’s FTP.
Once you’ve established this connection, you’ll be able to:
- Access files on your website
- Transfer files from your computer
In What Scenarios Should We Use FTP?
So, you might be wondering why we need an FTP WordPress connection. After all, we already have an excellent way of uploading files from our computer to our website.
The main reason it’s great to have an FTP WordPress connection option is when you have a problem with your website, or if it’s experiencing technical difficulties. This trick is essential when your website is down for whatever reason and you’re trying to troubleshoot the issue.
Let’s explore the main reasons to establish an FTP-WordPress connection.
- You can install plugins and themes directly if the WordPress dashboard is in maintenance mode or unresponsive.
- To manually disable themes or plugins when the WordPress dashboard is giving your trouble.
- WordPress can be a little sluggish when uploading files. If you have large-sized media files you want to upload a single or bulk of files, you can access FTP and send the files to your website hosting service.
- To troubleshoot or fix errors on your website.
- Customize specific WordPress functions.
- Customize WordPress plugins or themes.
- Back up the files from your website and onto your personal computer.
As the years have rolled by, WordPress has improved the functionality of its product and dashboard functionality. As a result, most people no longer need to access FTP to perform many duties. However, FTP still plays a vital role if your site has crashed or you’re having security issues.
What are good FTP clients?
You’ll need an FTP client if you want to run an FTP WordPress connection. There are several different options to choose from on the market. We’ll outline a few of them below to see which one works best for you.
FTP clients provide a user-friendly and intuitive user interface, so you perform typical functions like copying, renaming, editing, deleting, or uploading different files and folders.
While many FTP clients have the same basis and similar functions, some differences exist.
Some of the main questions to ask yourself when you are choosing an FTP client are:
- What operating system do you run? Which version?
- Do you prefer a point and click interface or drag and drop?
- How fast do you need your files to transfer?
- What size of files do you want to send?
- Does it support transfer to third-party sites like Google Drive or Dropbox?
- Does it have extra features, like user shortcuts, file explorers, search tools, etc.?
- Which FTP clients offer the best security?
Below, we’ll recommend the five best FTP clients you can use for your FTP WordPress transfers.
Top 5 FTP clients for FTP WordPress connections
Cyberduck
Cyberduck is available on Windows and Mac. There is a lot to love about Cyberduck: it’s free, super quick, and the interface is intuitive. Another significant advantage is that it can link your website to third-party cloud-based options like Google Drive, Microsoft Azure, and Dropbox.
Cyberduck is also pretty secure. It uses encryption to send your files securely. Finally, it features a simple drag and drop interface.
All in all, it’s a superb option.
FileZilla
FileZilla is another great free FTP client. Just like Cyberduck, it’s straightforward to use. While it might not have Cyberducks polish, it has plenty.
FileZilla has a helpful drag and drop interface, a fantastic side-by-side file display, and a simple remote file search.
It has a pretty active community of users and developers, and the software is frequently updated. In addition, it also supports the transfer of large files (up to 4GB)
It is also available for Mac and Windows and comes in a few different languages.
WinSCP
WinSCP is a free, open-source FTP client for Windows. It has an effortless drag-and-drop interface with a side-by-side window to track which files are on your computer and which are hosted on your website.
The best thing about WinSCP is how user-friendly it is. Documentation on the website is good, and the forum is active enough to provide support if you need it.
Two other pluses are language support and secure encryption.
WS_FTP Professional
WS_FTP Professional is an excellent option for security-conscious website administrators. It’s a premium option, but that is reflected in the price of $54.95.
This client won’t be for everyone, mainly when so many good free alternatives exist. However, it’s your best choice if you’re worried about network sniffing. FTP transfers sent over WIFI could become interceptive, and depending on your site’s content, you might need to employ an extra layer of security.
WS_FTP Professional uses encryption, file syncing, and backups. The high level of encryption makes this a standout option.
Transmit
Transmit is a free FTP client for Mac. It’s the most popular option for Apple users. The interface is good and an excellent choice for managing and transferring files.
Transmit has a free option, but the full version is $45. For many people, the interface and extra functionality will justify the price. For example, it allows you to manage files on multiple servers and has good security functions and integrations with DropBox and other file hosting services.
Transmit’s lightning-quick speed, batch editing, and excellent shortcuts are also great. Overall, a superb FTP client.
How to Get the Server Credentials?
When you need to run an FTP WordPress connection, you’ll need access to the FTP server credentials.
Your web host should have sent you this information when you opened your account. However, if they didn’t, or you’ve misplaced them, here is a step-by-step guide to getting this vital information.
-
Go to your website’s administration page—log in using the username-password combination given by the web host.
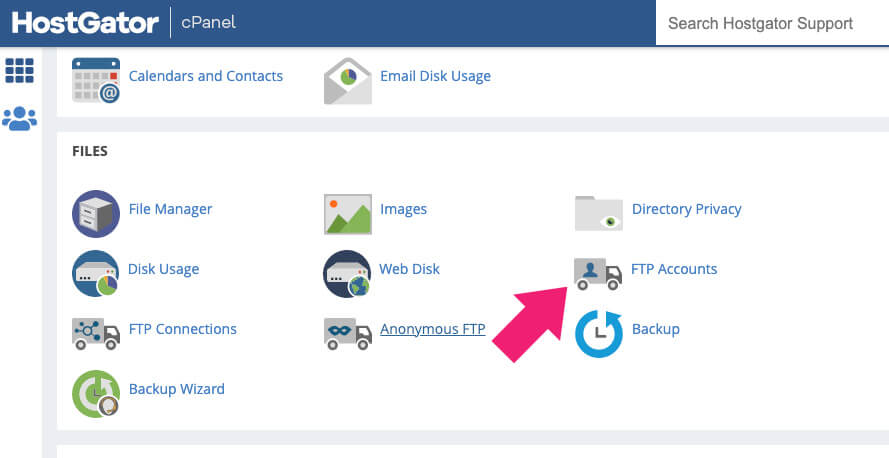
Now, go to the administrative panel. The most popular admin panel is called CPanel, but depending on who your web host is, they might use something different. -
Access “FTP Accounts.” If your web host uses CPanel, you’ll find this in the “File” section.
-
Once you’re in the “FTP Accounts” section, go to the end of the page. You’ll see a list of usernames if you’ve already set up an FTP account.
-
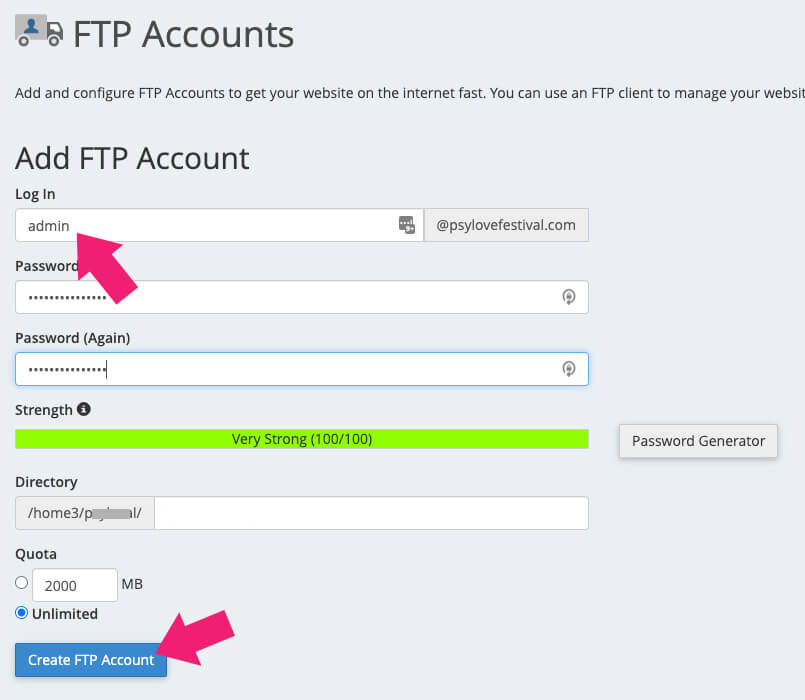
If you don’t already have an FTP account, you’ll need to make a new one. This is easy to do by entering a user name in the “Login” field.
-
CPanel will ask you to create a password to go with your username. It’s best to pick something super secure. Use a Password Generator or something complex that you’ll remember.
CPanel has a password strength feature, so make sure you choose something strong.
Type in your password. When prompted, type it in again to ensure they match. -
Keep the default root directory empty.
However, there are some situations where you might want to do something different. For example, if you are making an FTP account for someone else, you might want to limit the files they can access. -
Next, CPanel will ask what size Quota field you want. The default setting is “Unlimited.” This setting is essentially a way to cap what size files can be uploaded.
If only you use your website, it’s OK to keep this unlimited. However, you might want to restrict it if you’re making an FTP account for someone else.
The newly created FTP account will be added to the existing FTP accounts list.

How to Connect to WordPress with FTP
OK, now that you:
- Know what FTP is
- What FTP client is best for your needs
- How to get your server credentials
It’s time to learn how to use FTP for WordPress file transfers.
We’ll take you through a simple step-by-step process.
#1. Always backup your website files
The first and most crucial step is to back up your website files. When you make changes to your website via the WordPress dashboard, there are undo / History options where you can revert any mistakes or errors.
FTP WordPress changes are different. They are both direct and permanent.
With that in mind, it’s best to ensure you have a backup saved in case anything goes wrong.
It’s good practice to automate your backups. Relying on manual backup can be poor unless you are very disciplined.
WordPress websites have three main sections. They are:
WordPress core files: This section is the code that runs WordPress. You can download this anytime, so it’s not an essential backup item.
The wp-content folder: This section has all the files and images you’ve uploaded. You may already have them on your computer, but it’s nice to have them in one place, so they’re worth backing up.
This section also contains plugins. You can back them up, but they’re also available to download unless customized. So, not an essential backup but worth having.
Database: This section contains all your essential data. It has your users, posts, admin data, etc. You need to ensure that this is backed up.
You have three choices for backing up your files before making any FTP WordPress changes.
Backup Plugins: There are many free or low-cost options like BackWpup or BackUpWordPress These plugins backup your WordPress files and data and store them safely on a third-party server.
Ideally, you should store any backup on a different server than your host files. If anything happens to one server, you have the other copy.
Third-party off-site options: Jetpack/VaultPress is the WordPress backup solution. It’s not free, but it has some great options, like an automated backup.
For $3.50 per month, you get an off-site backup solution and excellent security features. It’s easy to use too, which is always a bonus.
Webhost backup solution: Your web host may also offer a backup solution. Typically, web hosts connect with the WordPress server for all their clients.
However, don’t assume your web host offers this service. Read their documentation or simply ask them how they handle backups.
#2. Install your FTP client
Before making any FTP WordPress changes, you must install your FTP client. We’ve provided a list of the top 5 options above. For this article, we’ll use FileZilla because it’s available for Mac and Windows and has some great features.
Simply go to the FileZilla website and download the “FileZilla Client.” You won’t need the FileZilla Pro version, but we recommend downloading the free version with the manual.
Once you have the file, run and install it, and it will be on your desktop and ready to go.
When you’re ready to make some FTP WordPress changes, just click on the FileZilla icon, and it will launch.
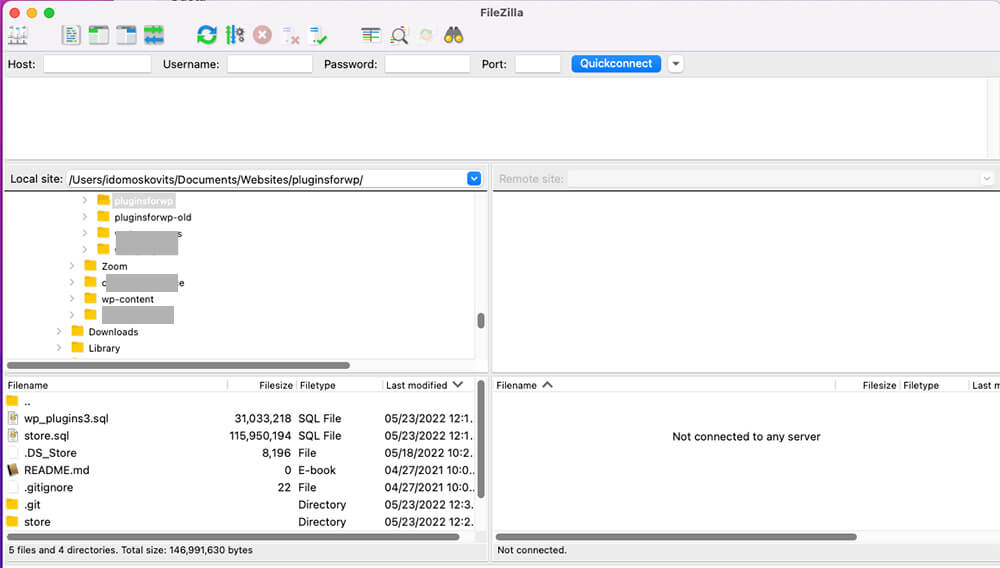
The first screen you see is split in two. One side is for the files you have on your computer, while the other shows the files on your server. If you’re running FileZilla for the first time, this section will be empty and say, “Not connected to any server.”
#3. Connect to the server
The next step is connecting to the server.
Four text boxes are running along the taskbar on the FileZilla interface. They are:
- Host
- Username
- Password
- Port

You’ll recognize some of these from the section above where we showed how to get your server credentials. If you haven’t done that step, you must do it now! You can’t perform FTP WordPress changes without connecting your computer to the server via your FTP client.
To establish a connection to your website via FTP, you’ll need
- Your web host’s FTP address
- FTP username you chose earlier
- The FTP password you picked above
- The designated port your host uses for FTP
Use the method shown above for accessing your credentials via CPanel. Enter them into the
text fields in FileZilla and your FTP WordPress connection should be established.
Most times, the host address is ftp.yourdomain.com and the default port is 21. You can try it first with your username and password and test the connection.
If it didn’t work, click on the configure FTP client link to reveal the unique credentials of your host.
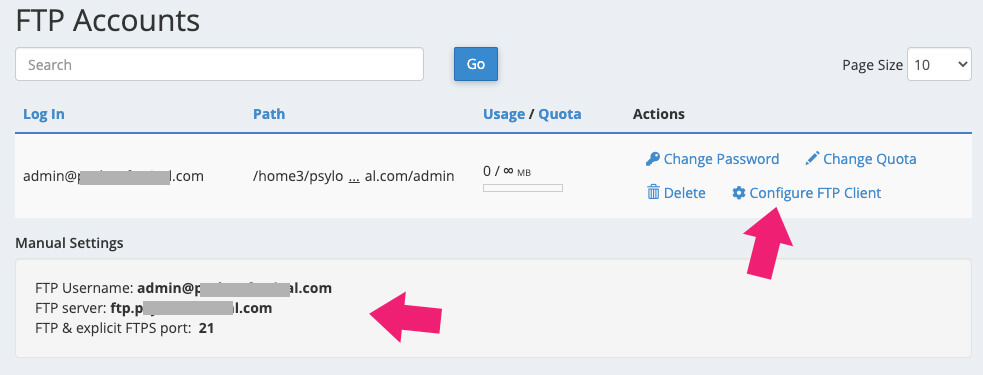
Now, you are ready to make FTP WordPress file transfers.
#4: Manage and access FTP WordPress files
Once FileZilla is connected to the server, the interface should be split into four sections.
On the left are two panels—the first displays the folders on your computer, and the second displays subfolders and files.
On the right, there are also two panels. These have all your website files and folders.
FileZilla is all about simplicity. To move files from one part to the next, you must drag and drop from one panel to the next.
What files and folders do I need to know to do an FTP WordPress file transfer?
To make changes or edits to your site, you must find the relevant files and folders on the server.
Click on the top right panel. There should be a file named after your website’s domain name. If your site is www.johnsautorepairs.com, the file will be johnsautorepairs.
However, there are some situations where it might be labeled differently. It could be simply called www or public_html.
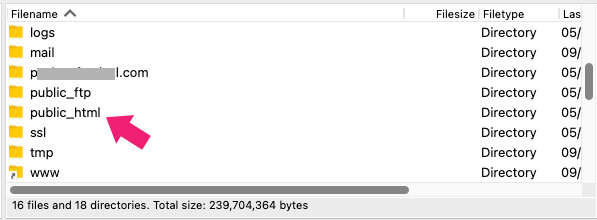
Access this folder and look at the content. Find a subfolder called public. This folder will contain all your website data.
Remember the wp-content folder we talked about in the data backup section? Well, that’s what you’ll want to find.
Inside wp_content, you’ll see two essential subfolders which will contain your:
- plugins
- themes
You have a few options when it comes to themes. Your FTP WordPress connection will allow you to:
- change your current theme
- delete a theme
- or install a new theme
All of these choices are useful in specific scenarios. For example, if you want to install a new theme, you can drag and drop it from your computer files into the theme folder.
It’s important to note that you create a new copy while dragging and dropping a file from your computer to the server. The original file will remain on your computer, while the new document will be on your server.
#5: Open and edit the files
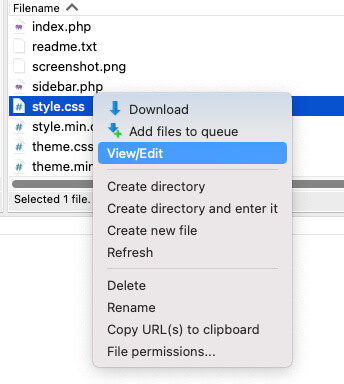
All the things you can do via your FTP WordPress connection are available when you right-click on a file in FileZilla.
The six-core options are:
- Download the file via FTP straight to your computer
- Add the file or files to the queue
- Delete a file from your reserver
- Rename a particular file
- Change or adjust a select file’s permission
- Create new files or directories.
Drag-and-drop makes this process straightforward.
To add a new theme, you must download it to your computer first. Then, select it on the left panel and put it inside the wp_content/themes folder.
Uploading plugins and themes are done in the same way. Once your FTP WordPress transfer is complete, you should go to your dashboard and click, for example, “Plugins” on the left panel. From here, you can activate the plugin that you have uploaded.
Downloading a file to your computer is just as simple. Once your FTP WordPress connection is established, you can select files on the server and bounce them over to your computer folder on the left-hand side.
Establishing an FTP WordPress connection is that simple.
PRO TIP: While drag-and-drop is super easy to use, some people say it’s better to use the right-click option and select “Upload.” The reason is that when you use drag-and-drop, there’s a slight chance you’ll upload a file to the wrong folder. If your files are in the wrong place, WordPress won’t run properly, so whatever option you choose, ensure you get things right.
Conclusion
Running an FTP WordPress connection is helpful for several reasons. If WordPress is down or you’re locked out of your account, you can use an FTP client to perform fixes, disable plugins, or grab any needed files. Additionally, it can be a great way to remove any malfunctioning plugins or themes.
The other benefit of using an FTP WordPress connection is that it gives you a deeper understanding of how WordPress works. If you are a website admin or user, it’s good to open the hood and look at how the platform works.
While knowing how to access your WordPress files in an emergency is a handy skill, it shouldn’t cause you to become complacent.
The only way to know that your files are safe is to set frequent backups to a server in a different location than your website’s hosting. Having two (or more) copies of essential files is the best and most secure practice.
Also, make sure to subscribe to our YouTube channel and like our page on Facebook.

