Designing a new website is no mean feat. The goal is to create something that your visitors will enjoy. But you don’t want the process to take forever or bore you out from being too complex that you would need to pay extra bucks to a developer for every change that requires a coder.
You’ve certainly stumbled across WordPress as a reliable solution while surfing web pages off your laptop. Combining the most robust CMS platform with CSS will create a beautiful powerhouse website.
This beginner’s tutorial will expose you to clear answers to any doubts or questions you may have about WordPress and CSS.
What is CSS?
CSS (Cascading Style Sheets) is a coding language that creates the overall appearance, feels, and layout of a website. CSS is combined with HTML to build a website’s graphic elements. Websites would be confined to boring plain text on white backgrounds if CSS wasn’t used.
In the late 90s, CSS development by the World Wide Web Consortium (W3C) allowed for more flexibility and creativity in web page design. Before CSS, Web pages were limited in how they looked and functioned.
Their browser page came off as a hypertext – made up of images and plain text. CSS changed all that, allowing for a much richer and more varied user experience on the web. CSS enabled significant advancements in website layout, including the ability to:
- Provide fonts away from the browser’s default fonts
- Text and links became distinguished by their color and size.
- Fill colors to plain backgrounds.
- Use boxes to contain site items and float them to particular locations on the page.
How Does CSS Work?
To fully comprehend the essentials of how CSS operates, it is first necessary to have a working knowledge of HTML. Web developers typically arrange pages using the “box model.”
This model envisions a web page as a series of boxes, with each box containing a separate element. These boxes are then integrated within each other.
For example, the header of a page is typically a box containing several smaller boxes, each of which comprises all of the elements that make up the header, including the logo, social icon buttons, etc. A CSS developer can assign different styles to the “header” box, such as specifying text color, font type, and size.
CSS is written with [Property] : [Value] pairs and commands the browser on how to style the elements of the document. For example:
header {
background-color: blue;
}
The CSS rule above will paint the header’s background color blue.
Why Use CSS?
CSS has a lot of advantages; some of them are:
User-friendly experience
CSS isn’t just about making things look good—it’s also about making them easy to use. It’s a better experience for everyone when the buttons and text are in suitable locations and everything is neatly arranged.
Faster page speed
When there’s more code on a page, it takes longer to load. CSS also allows you to write less code and execute a single CSS rule to all instances of a specific element in an HTML page.
Swift development output
With CSS, there’s no need to rewrite the same code for every page. You can create one set of rules and have it automatically apply to everything else. This is especially handy when you want pages to share a familiar look and feel.
Simple formatting styles
If you need to change the look of specific pages, it’s easy to do with CSS. You don’t need to edit each page individually. Just apply the CSS code to the page’s body class, and you’ll see the changes applied to all the pages.
Cross-compatibility in devices
In today’s world, responsive web design is more critical than ever. With so many different devices out there, your web pages must be easy to see and navigate on whatever people are using.
CSS and HTML work together to make responsive design possible so that you can reach everyone no matter what.
Best CSS Practices to Help You
Maintaining a vast CSS file gets more complex as you work on larger stylesheets and projects.
Let’s look at some recommended practices for writing CSS that make it simpler to maintain and some methods that others are adopting to make it easier to maintain.
Stay Consistent on It
Whether you’re in control of the project or working alone, it’s critical to maintain continuity. Consistency can refer to various things, such as defining color in the same manner, every time, using the same naming conventions across classes, or performing the same work consistently.
Because many decisions have already been made, following basic principles can make CSS easier to write and implement.
Go Easy on the Colors
The colors in your design should be the same throughout. It’s essential to maintain your brand’s colors. It’s easy to get carried away if there are too many different tones of the same hue.
Use caution while using rgba() or hsla() since the colors will change based on the backdrop. For a more specific color, we suggest using hex code.
Make it Readable
Most people do not think about CSS readability, although it’s pivotal to the survival of your website. It will be much easier for you to manage your CSS in the future if it is well-written and straightforward to understand.
You’ll be able to discover elements faster and make adjustments with more ease. Plus, you never know when someone might need to look at your code.
Let HTML Come First
Numerous designers develop CSS as they go, integrating it into the HTML as they build their site’s prototype. This may appear obvious, but creating the HTML first will save you time in the long run.
The logic behind this strategy is that you already know all of the items you’ll need for your site’s layout, but you’re not sure what CSS you’ll require.
Making the HTML first helps you see the entire page and think about CSS from a more comprehensive, top-down perspective.
CSS zen garden is full of great examples of how the same HTML structure can look unique when applying different CSS rules.
Make Use of a Reset Stylesheet
A reset stylesheet is essential if you want your website to seem consistent across all browsers.
This will override the browser’s default styles and render everything uniform. For the most remarkable effects, make sure you apply styles to the majority of HTML components.
There are a lot of alternatives when it comes to CSS resets. Eric Meyer’s CSS reset is one of the most popular resets available.
Where is the CSS in WordPress?
You can edit your stylesheet directly from the WordPress dashboard, which is the most straightforward method. There is no need to install any FTP or coding editors. With built-in syntax highlighting, you can easily edit any file.
Always backup your WordPress site before making significant modifications to the main files. If you’re new to CSS, it’s simple to make a mistake that can destroy your site’s design, and finding out how to undo your modifications may be challenging.
Log in to your admin once you’ve created a backup. Go to the menu and choose Appearance> Theme Editor to access the editor.
A window should appear, alerting you not to change these files directly. Don’t be concerned; click “I understand.” It’s just a heads-up to utilize a child theme and store your website’s data before making significant modifications. If you follow those procedures, you should be able to modify them.
And that’s it! You’re in! If you’re not already on the stylesheet, go to the right-hand menu to see your theme files.
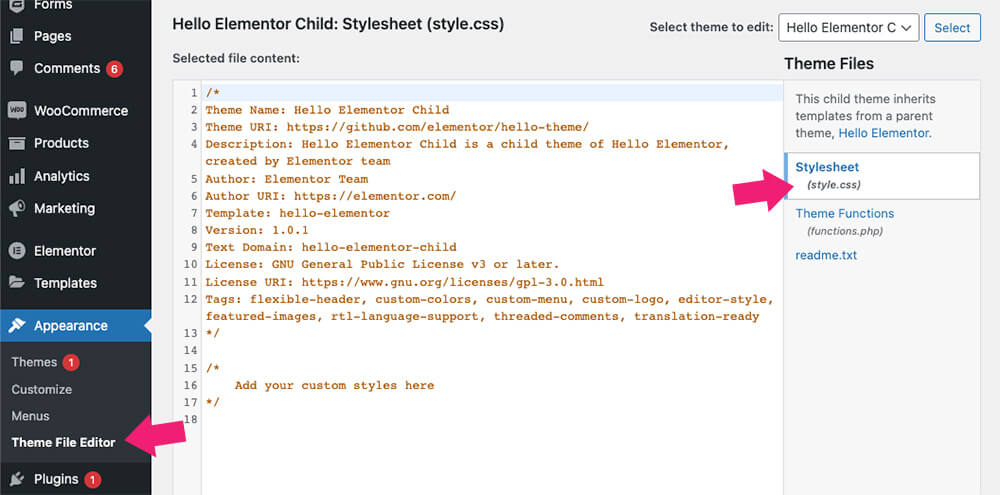
You will access template files such as functions.php, header.php, and single.php, in addition to style.css. All of these things have an impact on how particular pages on your site behave.
However, before entering those specific files, you should acquaint yourself with PHP.
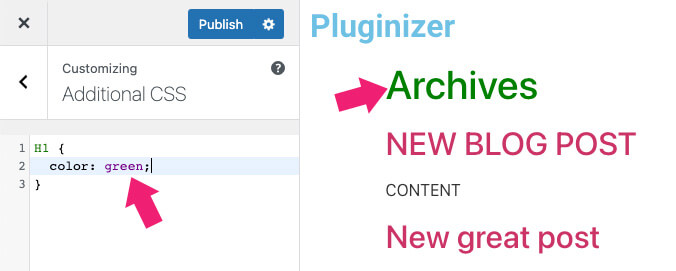
Remember that most of the CSS decisions you make here will affect the whole site. For example, if you alter the font of your H1 headers, it will appear on every website page. To modify the style of specific pages, you’ll need to utilize special syntax.
How to Edit WordPress CSS
You can also use the theme editor to alter your CSS by editing the .css files. It’s best to utilize a child theme and make a backup of your data while using this strategy.
While in the Theme File Editor screen, find the CSS file you wish to change in the right column (Theme Files). If your theme has a file titled custom.css, that’s where you should put your custom CSS code. Alternatively, you may change the supplied style.css file to suit your needs.
Remember to click the Update File button when you’ve finished editing to save your changes. That’s how you can modify your theme files from the dashboard without using an FTP client like Filezilla to update the files.
Another option to edit WordPress CSS is through the Customize panel.

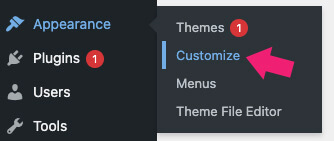
To get started, go to your WordPress dashboard. Click on the left menu, hover over Appearance, and choose Customize (Appearance > Customize).
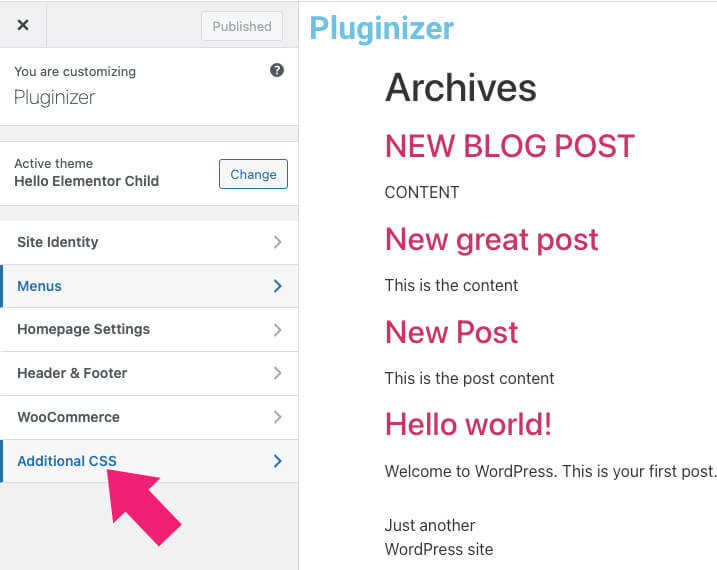
Expend the Additional CSS option and hit it once you’re on the customization page with a real-time preview of your site.
You will see an empty field where you can write your code; you can also update the CSS of your site.
To save your changes, hit the Publish button after updating your CSS.
How to Add Custom CSS in WordPress
Use the following ways if you don’t want the current CSS code changed and only want to add your styling: Using the WordPress customizer or a specialized plugin.
For starters, CSS code uploaded using one of these techniques is much simpler to access and utilize. In the future, you don’t have to worry about putting your new CSS in the wrong place or forgetting where you put it.
Furthermore, CSS applied via one of these ways will not be deleted whenever a theme is updated (though it may still disappear if you change themes). However, it is likely to undergo a theme change.
This eliminates the need for a child theme, and if anything goes wrong, erase the CSS you just applied.
Remember that you should still make a full backup since some users have experienced destroying their CSS after significant changes. Nonetheless, this procedure is much more dependable than manually modifying theme files.
1. How to Edit CSS Using WordPress Customizer
People typically utilize the Theme Editor screen to update the design of their website, but you can also do it from the WordPress backend. Log in and go to Appearance > Customize to get a preview of your site with some choices on the left. Colors, menus, and widgets may all be customized.
An “Additional CSS” box should be at the bottom of the menu. You will be directed to a new window with a code entry field and directions when you click it. Syntax highlighting and validation are available on the “Additional CSS” tab, letting you know if your code is incorrect.
After coding, you may either push it online, schedule it to go live later or store it as a draft. You may even get a preview link to distribute to others.
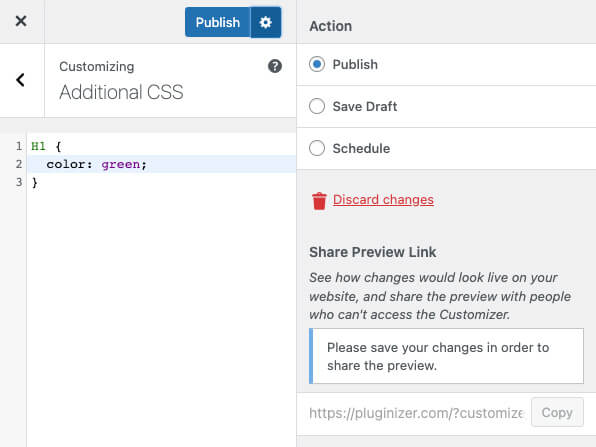
Additional CSS is much more sophisticated than the Theme Editor and is ideally equipped to add code rather than wreaking havoc on your theme’s core files.
The CSS code you provide here will replace your theme’s default style and will not be removed when upgrading your theme. Use the correct CSS code selectors if you don’t see them in your preview.
If you don’t take better care, whatever CSS you create will be lost forever if you move themes. Therefore, backing up your website is essential before switching themes so you won’t lose valuable work.
If you’re experiencing difficulties with this option or need a workable solution with any theme and can target specific pages more simply, consider utilizing a plugin instead.
2. Installing Custom CSS in WordPress: How to Do It Using Plugins
The first technique only enables you to store custom CSS for a presently active theme. You should copy-paste your CSS into the new theme if you change the theme.
This solution is for you if you want your custom CSS to be applied regardless of the WordPress theme you’re using.
The first step is to download and install the Custom CSS plugin. Navigate to Appearance » Own CSS after activation and paste your custom CSS.
Remember to save your modifications by clicking the Update Custom CSS button. You may now log on to your site and test how the custom CSS works.
3. Using the Full Site Editor to Add Additional CSS (FSE)
The Full Site Editor is another option to apply custom CSS to WordPress (FSE). You can, with FSE, use the WordPress block editor to change the layout and style of the whole website, just as you would when updating a blog post or page.
Please remember that you can only access the entire site for specific themes.
To begin, open the Customize screen as we showed above. Alternatively, you can also proceed to your browser and paste this URL displayed below, substituting ‘example.com‘ with your website’s domain name.
https://example.com/wp-admin/customize.php
After doing so, you’ll be sent to a restricted version that houses the theme customizer. At the bottom of the left-hand menu, you should notice the option to add custom CSS. Select the Additional CSS tab.
Now insert the CSS code in the section where you will find the Additional CSS. Click the Publish button after entering the code.
Different Plugins for CSS
The specific features you need in a WordPress CSS plugin will depend on your level of programming ability.
Some users may opt for plugins that rely entirely on the visual editor (no programming skills required), but others may want more control and plugins that provide multiple CSS editing.
If you’re a complete newbie, you should seek a live customizable plugin that allows you to make changes. The plugin will generate the necessary CSS code for you. Some CSS plugins even provide a design library you can use instead of relying on your imagination.
The CSS Hero WordPress Plugin
Get the plugin: official website ($29) || or from us ($4.99)
Once activating the plugin on your website, click on the CSS Hero from the admin bar.

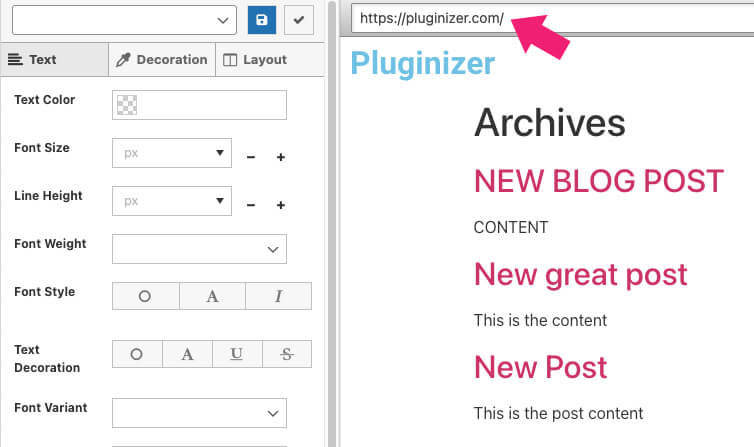
The plugin’s screen will be divided into two panels. The panel on the left will show you the chosen selector with styling options, while the one on the right will be a live preview of your website. Start by clicking on any element from the right panel.
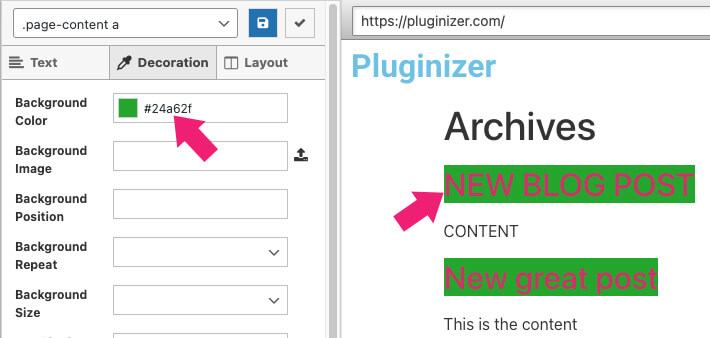
Then, click on the styling properties that you would like to add to the elements. For example, we can expand the background tab and choose a background color. Once selected, the CSS rule will be added to the component.
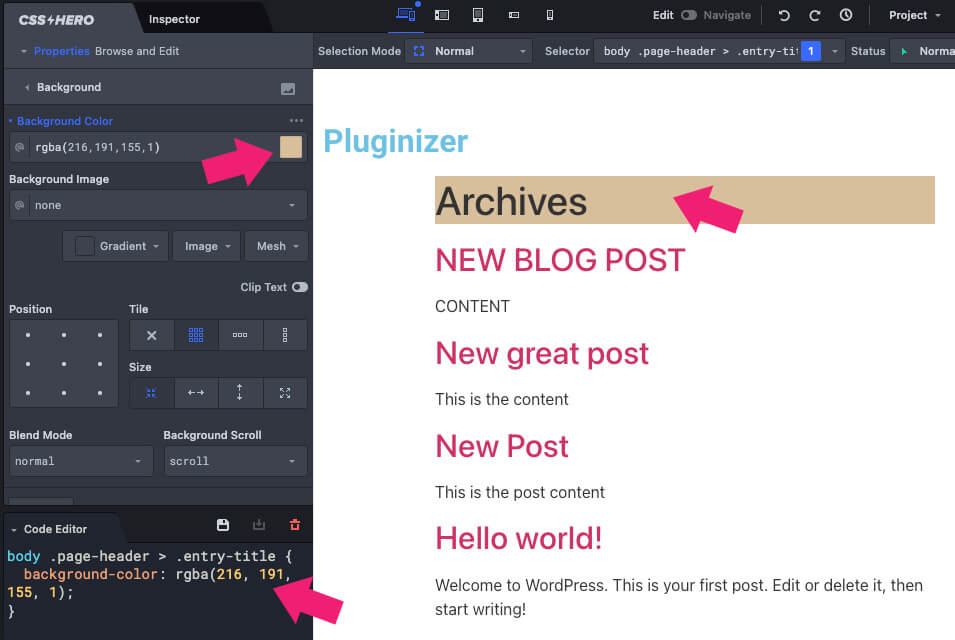
Finally, save the changes and visit the live site to verify it looks as expected.
SiteOrigin CSS Plugin
The SiteOrigin CSS plugin is another excellent choice to add custom CSS.
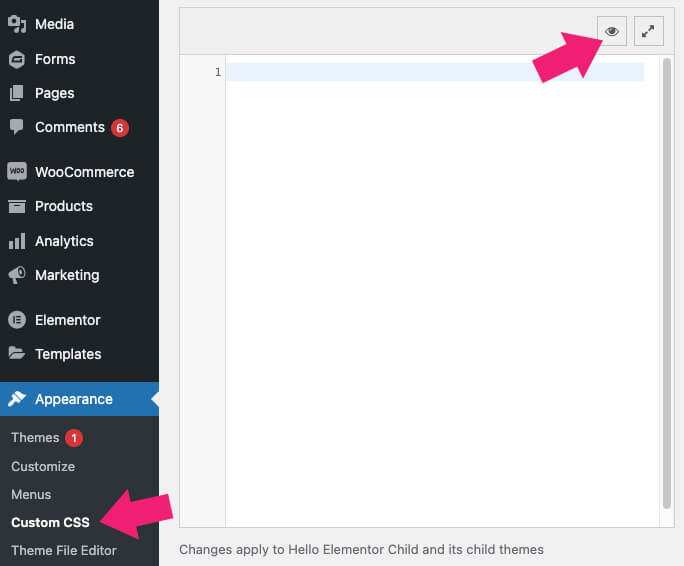
Once you activate the plugin, navigate to Appearance > Custom CSS and enter your CSS rules into the Textarea field.
Alternatively, you can also open their live site editor by clicking on the eye icon from the top right corner.
Then, navigate to your desired page by entering its URL at the top, or stay on the current page to start editing the homepage.
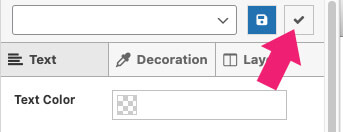
The OriginCSS plugin shares many similarities with the Hero CSS plugin. Select the element from the right side, and add styling options from the left sidebar.
Once styling your elements, click on the checkmark icon to approve and save the changes.
In addition, Advanced CSS Editor, Microthermer, and TJ Custom CSS are some of the most popular CSS editors.
The Custom CSS Plugin vs. Adding Custom CSS in the Theme
All of the strategies listed above are ideal for newbies. Advanced users may also easily customize their sites with custom CSS.
Adding custom CSS to your parent theme, on the other hand, is not advised. If you update the theme and forget to save your custom changes, you will lose your CSS changes.
Instead, a child theme is the best option. Many rookies, however, do not wish to develop a child theme. Aside from modifying CSS, many have no idea how to use the child theme.
It is possible to store your custom CSS independent of your theme using a custom CSS plugin. This approach makes switching themes easy while still having access to your custom CSS.
If you want to keep your custom CSS independent from your theme, an excellent way to do this is by using a custom CSS plugin. This way, you can easily switch themes without losing your customizations.
CSS Hero is a great plugin for adding custom CSS to your WordPress site. With it, you can edit almost every CSS style on your site without writing any code.
Conclusion
Working with the coding of your website might be frightening, especially for beginner users. However, when it comes to making fundamental changes, many of the languages on which your website is built are remarkably user-friendly.
Learning how to utilize custom CSS in WordPress may take some time, but it will provide unparalleled power over your site’s design and layout.
Instead of editing your theme’s CSS style sheet directly, use the WordPress Customizer to quickly and safely add CSS code. This method allows you to change the sizes, fonts, colors, and positions of various elements without completely changing the core code of your active theme.
Furthermore, you will be able to preview your changes in real-time, so you know the effects they have.
Also, make sure to subscribe to our YouTube channel and like our page on Facebook.