All WordPress websites have one common aspect if you don’t know this already. They have the same login URL.
So, your login URL can be yourwebsite.com/wp-admin or yourwebsite.com/wp-login.
If you think that makes things simpler for you, think again.
The fact is, this makes your website vulnerable to attacks from hackers and cybercriminals. And considering WordPress is the most popular content management system (CMS) used, the risks are higher.
So, changing the login URL is an essential step that you need to take to keep your site secure.
This article will show you how to change your login URL in WordPress in every possible way.
What Makes WordPress Login Important?
Once you install WordPress, you will have access to the admin dashboard of your website. This is where you can make all the necessary changes to your site.
The login page URL or the admin URL is the web address that allows you access to this management zone of your website. That makes it play an essential role in the overall management of the site.
Since this URL is standardized, anyone can visit the admin panel and access the site. Moreover, WordPress creates an “admin” username by default. It can make the hacker’s task even more accessible.
Now all that is needed is to guess the password you have set. As the hacker tries to guess the correct password, your site’s resources are wasted.
One recent study has shown that 75% of Americans set weak passwords. That means your site may not have the necessary defenses against intruders.
By changing the URL, you can reduce the risks and prevent your site from being overwhelmed by unwanted bot traffic.
Changing the WordPress URL will not offer you complete protection against hackers. But it will surely make your site less vulnerable to attacks.
Steps to Change your WordPress Login URL
The first step is to find your WordPress login URL, and it’s simple. You need to add /admin/ or /login/ at the end of your WordPress URL.
For example, you can use www.yourwebsite.com/login/ or www.youwebsite.com/admin/
Generally, these two URLs should take you directly to your login page. If that doesn’t happen, add /wp-login.php at the end of the primary URL (www.yourwebsite.com/wp-login.php).
You can change the WordPress URL manually or use a reliable security plugin. If you do it manually, you will need to change your site’s core files. If done incorrectly, this can affect the overall site functionality.
Also, every time you update WordPress, it will recreate the default login URL. So, you will need to redo the process from scratch.
Using a security plugin is a more straightforward and hassle-free method.
You can also change your URL by updating the functions.php file and inserting specific codes. However, using the wrong codes can result in errors and disable your access to the WordPress dashboard.
If you are not a coder or uncomfortable about using codes that you do not understand, the last method is the simplest one you can choose from.
Changing the WordPress Login URL with a Function
In this first method, we will change the default WordPress login URL with a PHP that we will paste into the functions.php file of our child theme.
If you don’t have one already, please read our how-to create a child theme article before moving forward.
Navigate to Appearance -> Theme File Editor and open the functions.php file of your child theme.
Scroll to the bottom of the file and paste the function below:
// Redirect default URL link to a custom page
add_action('init','custom_login');
function custom_login(){
 global $pagenow;
 if( 'wp-login.php' == $pagenow  && $_GET['action']!="logout" && $_GET['action']!= "lostpassword" ) {
  wp_redirect('link-goes-here');
  exit();
 }
}
Replace the ‘link-goes-here‘ with the actual link of your new login page. You can create a new login or registration form with Elementor or other plugins.
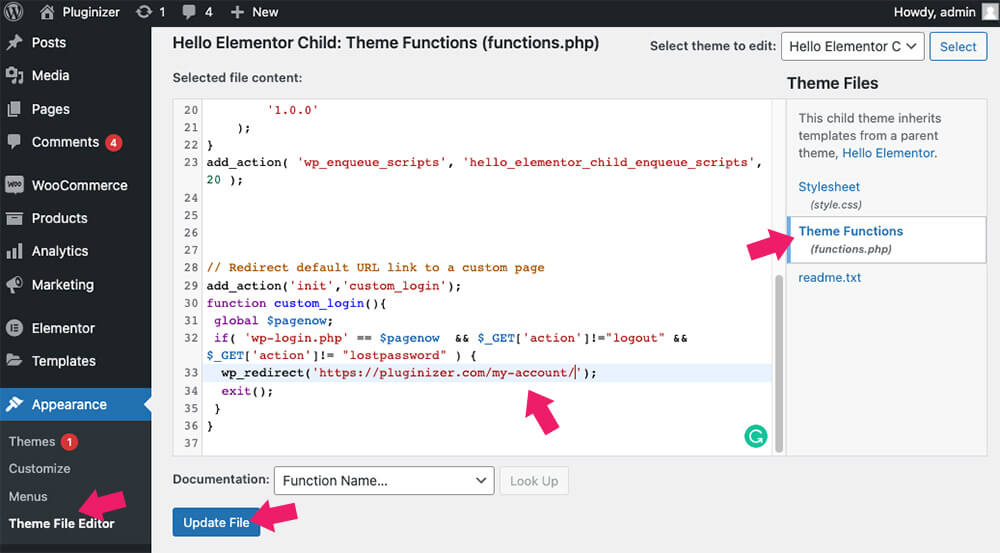
Once saved the changes, navigate to the /wp-admin link using an incognito window and verify that you’re being redirected to the new custom URL.
Changing the WordPress Login URL Manually
Changing the URL manually is not a difficult task. We have listed down the steps for doing it.
You will need to use a Code Editor like Notepad++ or Sublime Text. Regardless of which code editor you’re using, the steps are the same:
- Before you make any changes to the wp-login.php file, backup your website. In case of any errors, you can use the backup for restoration. This file is located in the public_html directory.
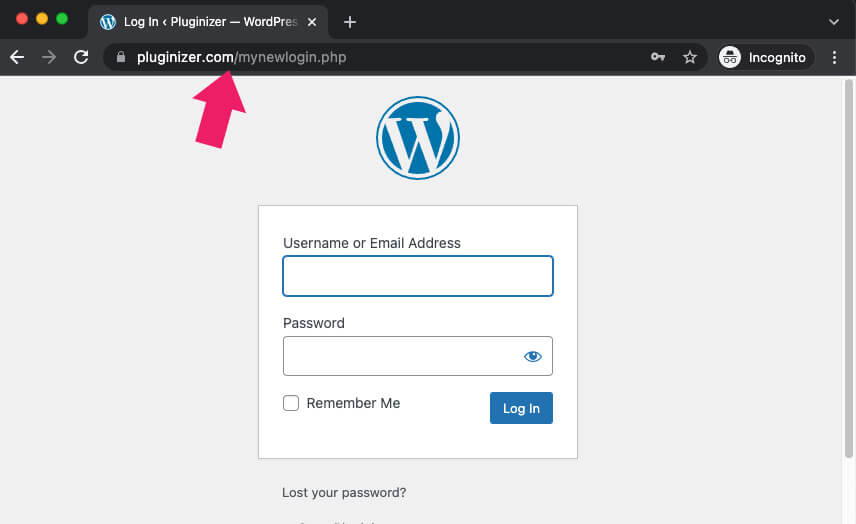
- Select a new login URL that you will use. Let’s assume that you have chosen /mynewlogin.php.
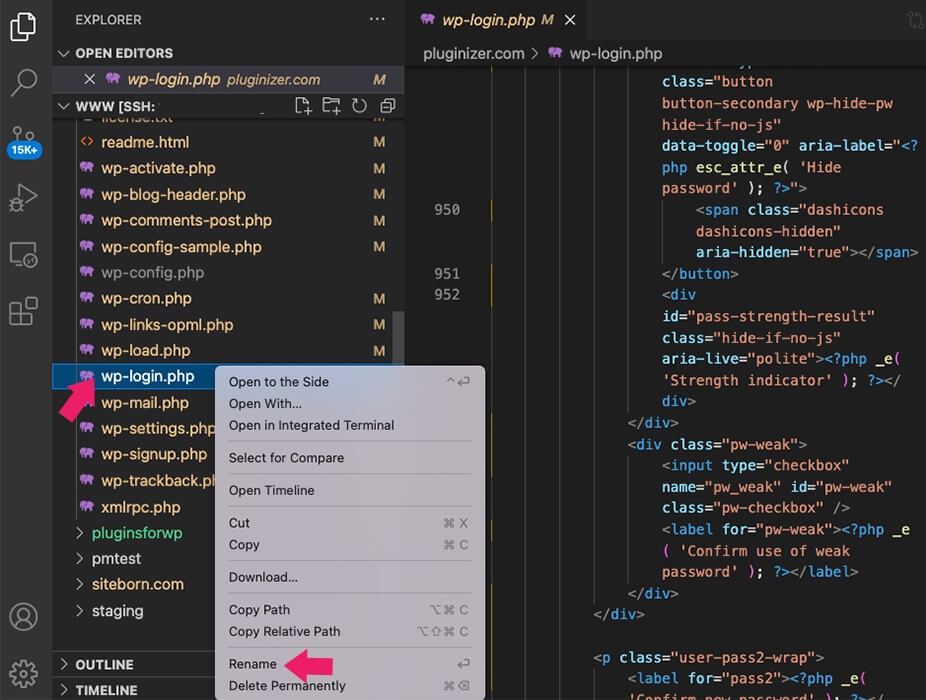
- Rename the wp-login.php file with the new login name you have chosen. That means you will rename it to /mynewlogin.php.
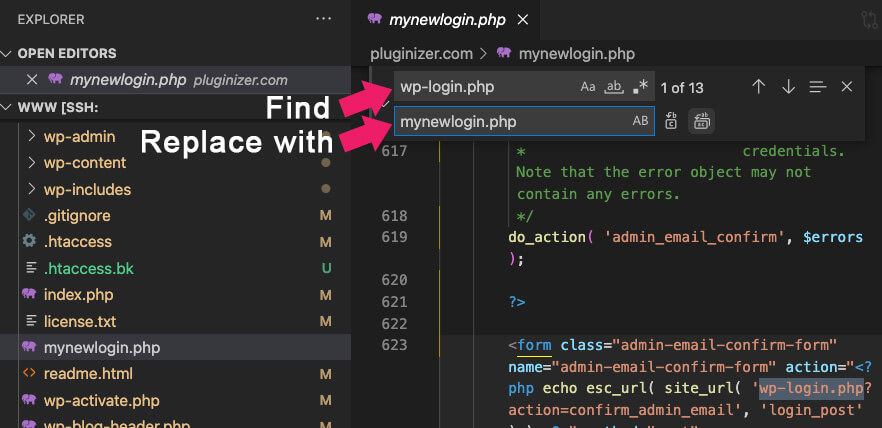
- Now open the mynewlogin.php file. Find all the instances of the term ”wp-login.php” used and replace them with “mynewlogin.php.” Select the replace all option for a quick change.
After saving the changes, you will log into WordPress using the new URL. In this case, it will be localhost/wp/mynewlogin.php. Anyone trying to log in using the old URLs will find a 404-not-found page.
If something goes wrong, you can replace the backup file in the root directory, and the site will return to the old format.
Changing the WordPress-admin URL With a Plugin
If you don’t want to make manual changes to the core WordPress files, using a WordPress plugin is a simple way to change the login URL. The good news is these plugins are free.
Multiple reliable plugins are lightweight and easy to use. Also, use an updated plugin that offers the best security.
How does the WordPress plugin work?
The plugin introduces some additional lines in the WordPress .htaccess file. However, it doesn’t modify or relocate the wp-login.php or the wp-config.php file.
Here are the steps you need to take.
- To start with, install the plugin and activate it. We will also recommend keeping a backup of your site before installing it.
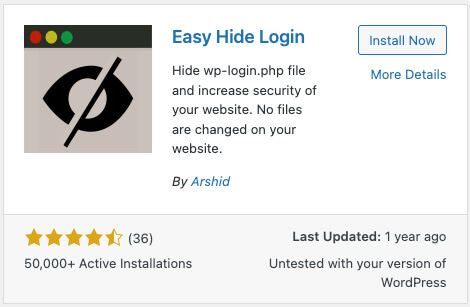
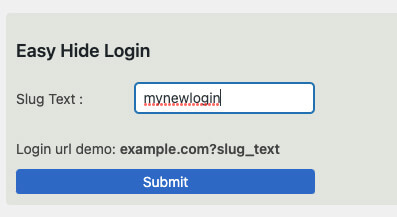
- Go to the WordPress admin dashboard and access Settings > Easy Hide Login.
- Once you access it, you will be able to put a Slug text in the window. For example, you can put mynewlogin as the Slug Text. Then hit the submit button. This will be your new login page. Anyone visiting the original URL will get a 404-error message.
- If you want to reverse the process, delete the Slug Text and press the submit or deactivate WPS Hide Login button. The URL will return to its original format.
Once you have finished changing the login page, please optimize your website by redirecting the logout link.
Change Login Page URL with Security Plugins
Another great option to change the default WordPress page is using different security plugins.
Installing a security plugin is a simple way to change the default WordPress login URL, and it will better protect your website from harm.
This section will learn how to change the default URL with some of the best security plugins for WordPress.
Perfmatters
The performance or optimization plugins will allow you to enable or disable WordPress features based on your preferences. Because WordPress is a multi-purpose platform that you can use for various options, it’s a bright idea to only enable the necessary features for you. That way, you can save valuable resources.
Many great optimization plugins increase site speed, improve SEO, etc. In this example, we will focus on Perfmatters.
You can get the Perfmatters plugin from the official website or us for only $4.99.
Once you activate the plugin on your WordPress website, navigate to Settings -> Perfmatters screen and scroll to the Login URL section.
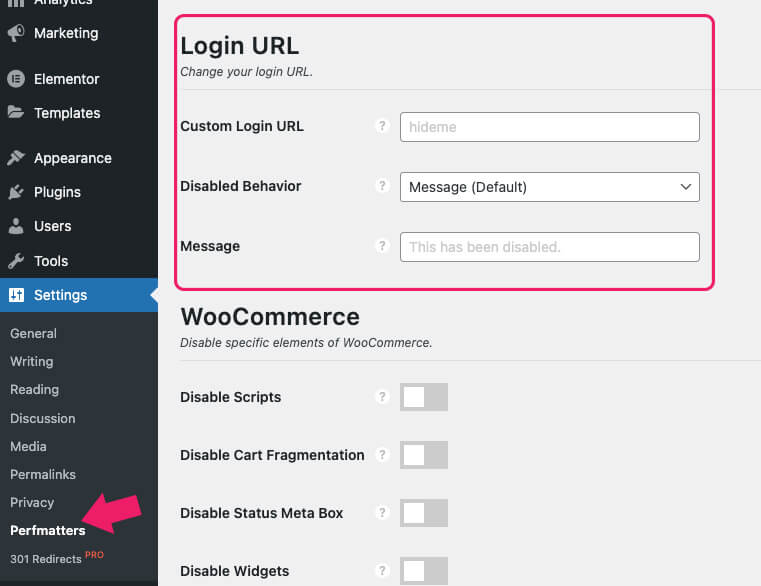
Please enter your desired slug into the custom login URL field to replace it with the default one.
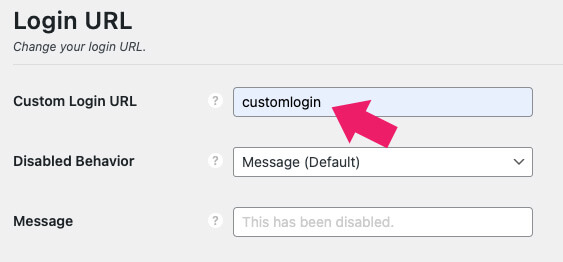
Once saved, navigate to the default login URL address /wp-admin and verify that an error message is presented instead of the login form.

Then, navigate to the new login URL you created and test the login form on that page.
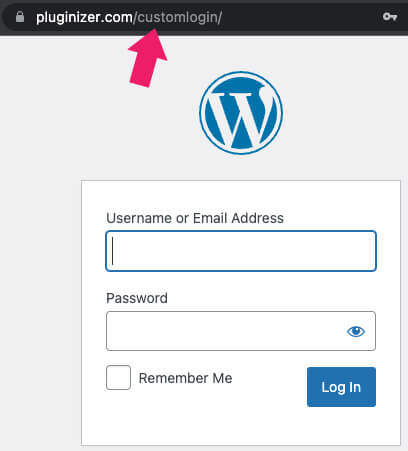
Alternatively, you can also modify the error message of the default URL page to a custom text or even redirect it to the homepage.
iThemes Security
The iThemes Security plugin is one of the most popular security plugins for WordPress, with over one million active installations.
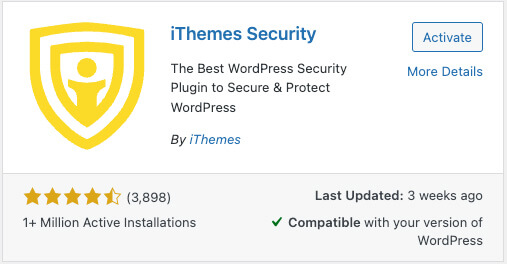
Once you activate it on your website, navigate to Security -> Settings -> Advanced -> Hide Backend, and enable the hide backend option.
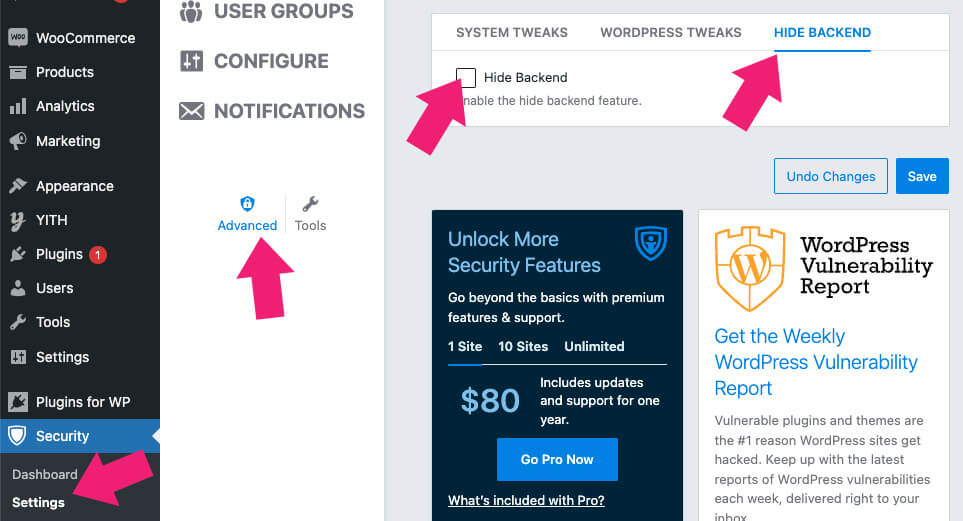
Then, enter the new URL login slug that you would like to replace instead of the default one and save the changes.
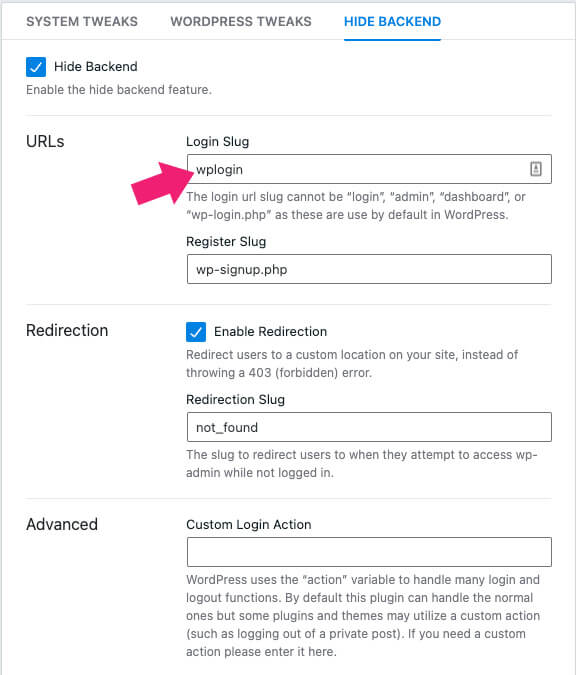
Once saved, the new URL will take effect, and the default URL will no longer work.
You can get the Pro version from the official website or us for only $4.99.
Defender
The Defender plugin by the WPMUDEV team is another great option to mask the default login link.
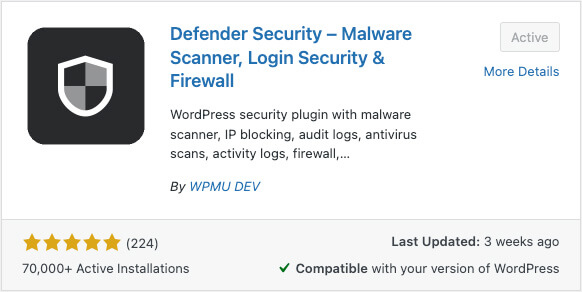
Once activated on your website, navigate to Defender -> Tools and click on the Activate button.
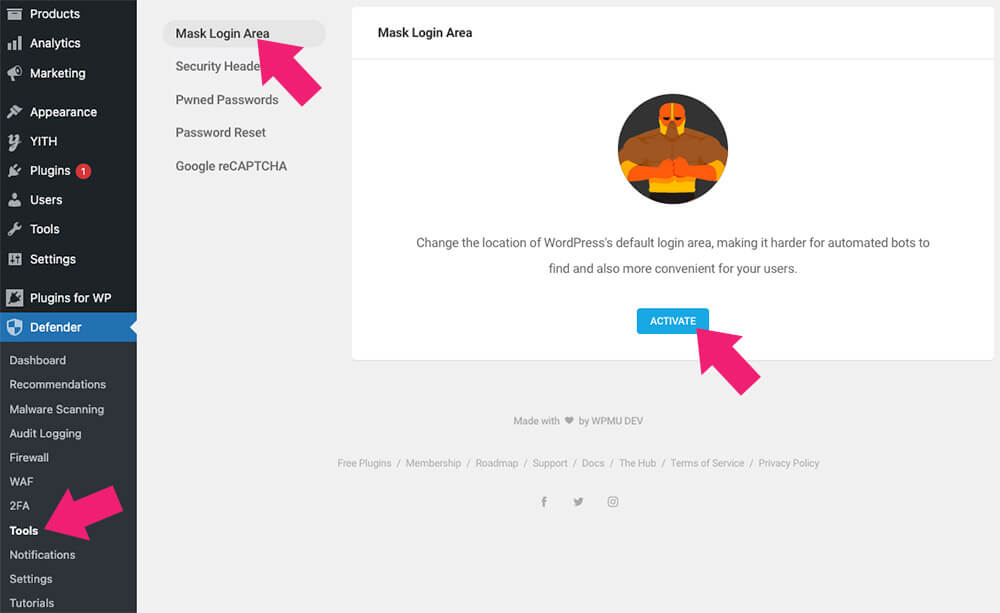
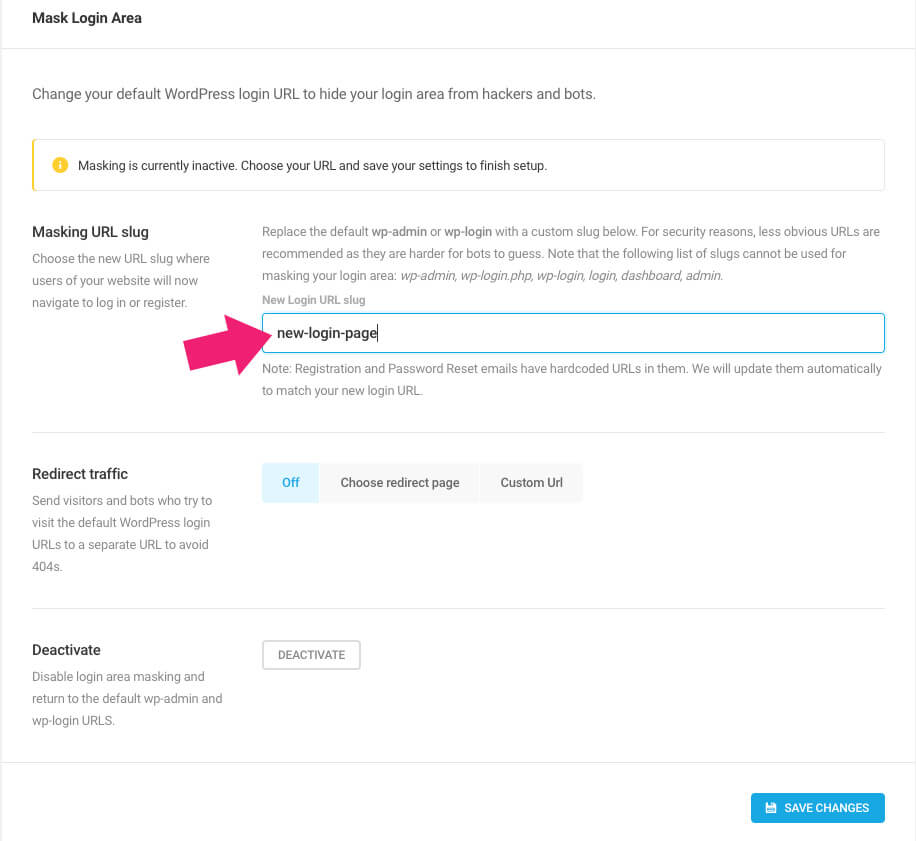
Then, enter your custom slug inside the masking URL slug field and save the changes.
You can get the pro version of the Defender from the official website or us for only $4.99.
SecuPress
The SecuPress plugin for WordPress is another powerful plugin to move the login and admin page.
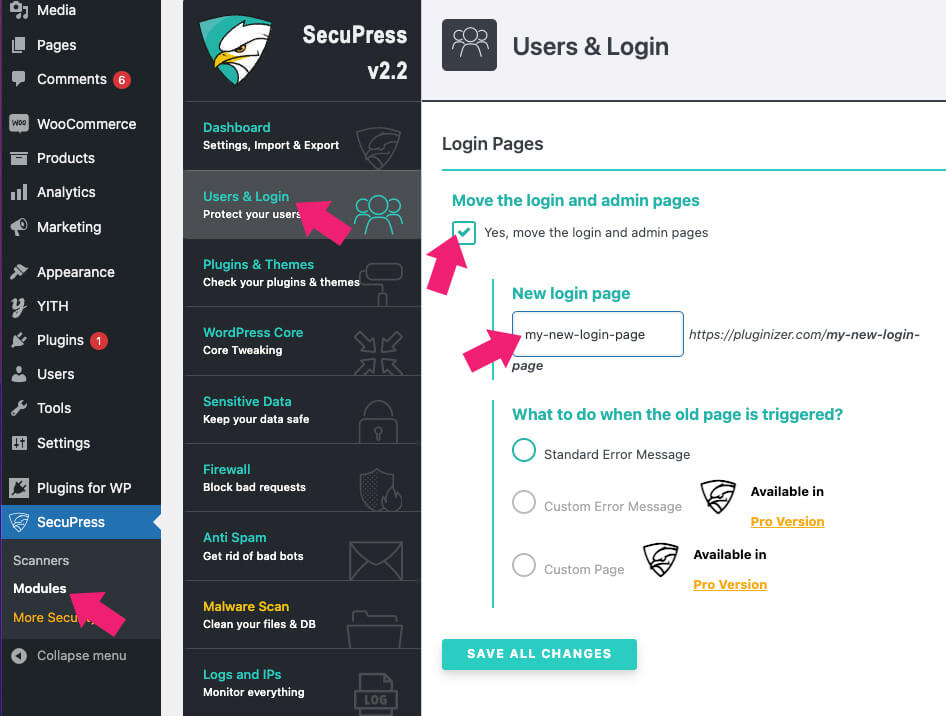
Once you activate SecuPress, navigate to SecuPress -> Modules -> Users and Login and enable the move the login and admin pages option.
Enter your custom new login page slug and save the changes to finish the process.
You can get SecuPress Pro from the official website or us for only $4.99.
Conclusion
So, these are the three most straightforward ways of changing the login URL of your WordPress site. All these methods are simple and will add additional layers of security to your site.
Even though WordPress is a secure platform, you can’t neglect this simple step to secure your website.
Leave us a comment and know which method you chose to achieve this task.
Also, make sure to subscribe to our YouTube channel and like our page on Facebook.


