

Badges are a great way to notify our website’s visitors about an ongoing product sale.
If you want to change the default badge color or text, you come to the right place.
This article will teach you how to remove or customize the WooCommerce sale badge.
What Are Sale Badges?
A sale badge will indicate that a specific product/s is on sale and its original price was reduced.
Because sales are usually running for a limited time, a badge like this will create scarcity in your visitors and encourage them to act quickly.
Studies show that using badges with your eCommerce store will increase the conversion rate by 55% and improve the overall revenue.
Moreover, because WooCommerce will automatically add a badge to a sale item, it is a no-brainer for us to keep and modify it to our needs to improve conversion even further.
Now that you know the importance of sales badges, let’s move on and learn which products display the sale’s badge.
Why is the Sale Badge Appear in WooCommerce
The sale badge will automatically appear when you set a discount price on a product in WooCommerce.
Navigate to any on-sale product page and scroll to the product data box.
There you’ll see the regular price and the sale price below it. If the sale price field is empty, there will be no badge.
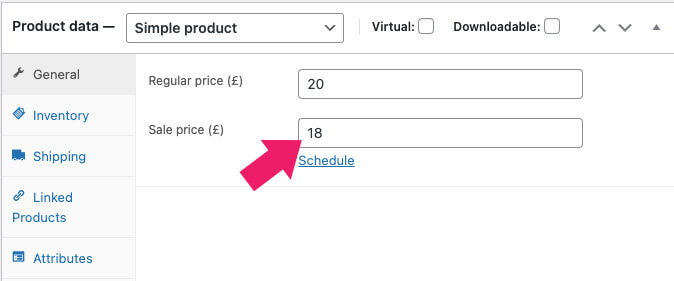
However, if the sale price field is populated with a number, the badge will be automatically added to the product.
The default badge text will say sale, and its color is green. If you like it that way, keep it. If you would like to change it, read the next section.

How to Customize the WooCommerce Sale Badge
In this section, we will learn how to change the text and color of the sale badge. Both ways are easy to follow, and let’s start by changing the text.
Change the Sale Badge Text
To change the sale’s badge text, we will use a PHP function that we will need to paste into our child theme.
Tip: please backup your website before editing core files.
- From your WordPress dashboard, navigate to Appearance -> Theme File Editor and click on the
functions.phpfile from the list on the right. - Scroll to the bottom of the file and paste this function.
add_filter('woocommerce_sale_flash', 'edit_sale_badge'); function edit_sale_badge() { return '<span class="onsale">TEXT-GOES-HERE</span>'; } - Make sure to replace the TEXT-GOES-HERE with your desired text and save the changes.

- Navigate to any on-sale product and verify that the text changes successfully.

Great job. Once you enter your custom text, we can customize it further by changing the badge color.
Change the Badge Color
To match the look of the badge to the rest of our website, we will need to change its color.
- Open to the customization screen.

- Navigate into the Additional CSS tab.

- Paste the CSS code below inside that box and replace the HEX-CODE with the actual hex number of your desired color. Read our how-to change links color in the WordPress article to find out how to get the hex code.
.woocommerce span.onsale { background-color: HEX-CODE; } - Save the changes.

Once you save the changes, navigate to any product page that shows the badge and make sure you change the color successfully.
When you finish changing both the text and color, explore more ways to improve conversions, like adding a countdown timer to create scarcity.
Read the following section if you couldn’t get the badge’s right look and prefer to delete it from your website.
Remove the Sale Badge
As stated above, the sale badge can benefit your store immensely, and I recommend you to keep it.
If, for any reason, you decide to get rid of it, removing it is a similar process to the one above but with a different CSS rule.
- Navigate to the customization screen.
- Enter into the Additional CSS tab.
- Paste the following CSS rule.
.woocommerce span.onsale { display: none; } - Save the changes.

Once finished, navigate to the shop archive page or any on-sale product pages and verify that you can’t see the badge anymore.
Conclusion
In this article, you learned how to customize the text and color of the sale’s badge in WooCommerce.
Leave us a comment and let us know if you have any questions about the process.
Also, make sure to subscribe to our YouTube channel and like our page on Facebook.


In responsive mode sale badge position shows in middle. I want to fix the sale badge position on the upper right corner in responsive mode. Please help me how can I fix it.
Can I get your site’s URL? I can then provide you with the CSS
Thank you very much!! I have followed the steps to remove the offer badge. I put the code, and it disappeared! The problem is that it works perfectly on the web, but the badge still appears on the mobile. How can I make it disappear from there too? Thank you very much! again!
Yes, you can with CSS, what’s your website’s URL?
Every time I try to change my badge’s color the all website slowdown
Which method do you use?