A website’s footer is the last section that appears at the bottom of every WordPress page.
The footer section often contains valuable links to other pages and copyright text.
Because WordPress has thousands of themes and every theme has its footer, it will be impossible for us to tackle every one of them.
Yet, there are many similarities between the footers and common ways to edit them.
This article will show you all the possible ways to edit your WordPress footer. The methods below can be used on most footers and are easily implemented.
I’ll provide you with general guidelines to try on your footer, and by the end of this article, you’ll be able to apply them to your needs.
Why Edit the Footer
Because the footer is located at the bottom of the website, many website owners tend to neglect it, but it must be treated with respect.
It is recommended to add valuable information about your business and website that you can’t add to the header because of limited space.
For example, showing the contact email address or location map can help your business immensely. When you position these two elements in the footer, they will be displayed on every page instead of the contact-us page only.
There are many more elements that you should add to the footer. Some are XML sitemaps, phone and fax numbers, social icons, etc.
So, let’s start editing the footer by jumping straight into the first method without further delay.
Method #1: Edit the Theme Footer File
We will dive deep and play with the theme footer.php file first.
If you have never dealt with or are unfamiliar with core files, you may find it scary to jump right into it. Yet, have no fear. We will only use it for small tasks like removing copyright text.
We will work with the default Twenty-Twenty theme and remove the ‘Powered by WordPress’ text in this example.

To know which section of the footer to delete, we must first get its class or ID attribute.
That way, we will find it in the footer.php file and remove it from there.
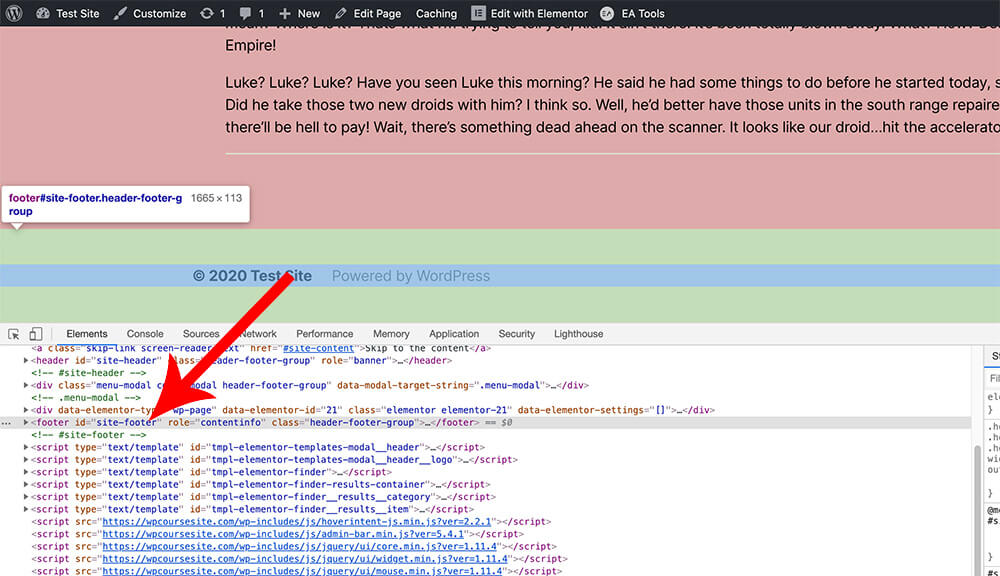
Inspect the item that you would like to edit
One way to find the item class is by using the inspect option of your browser. Right-click your mouse on the element you would like to inspect (the copyright paragraph) and choose ‘inspect.’
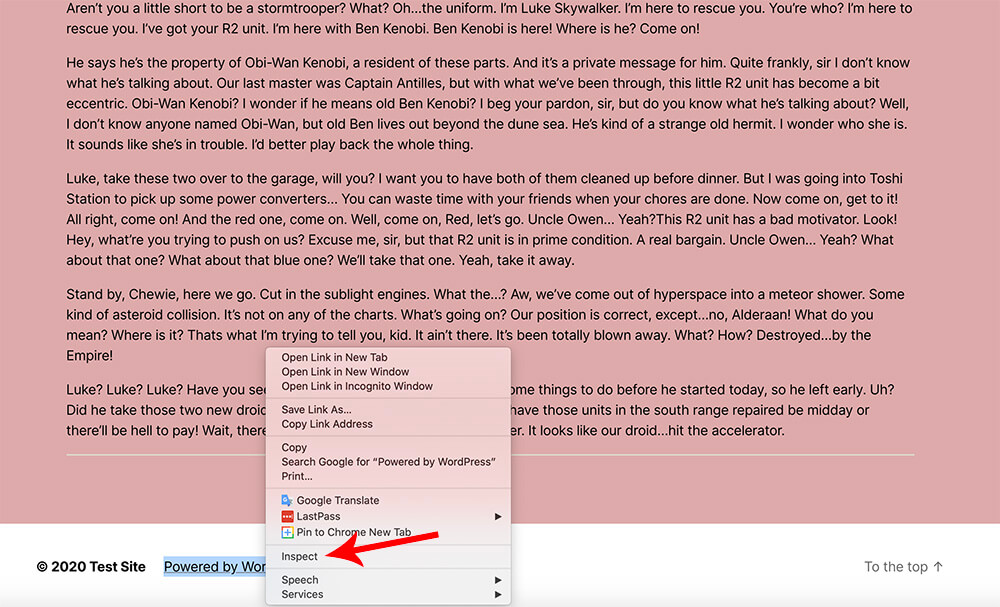
The inspect screen may look intimidating, but we will only use it briefly to find the suitable class.
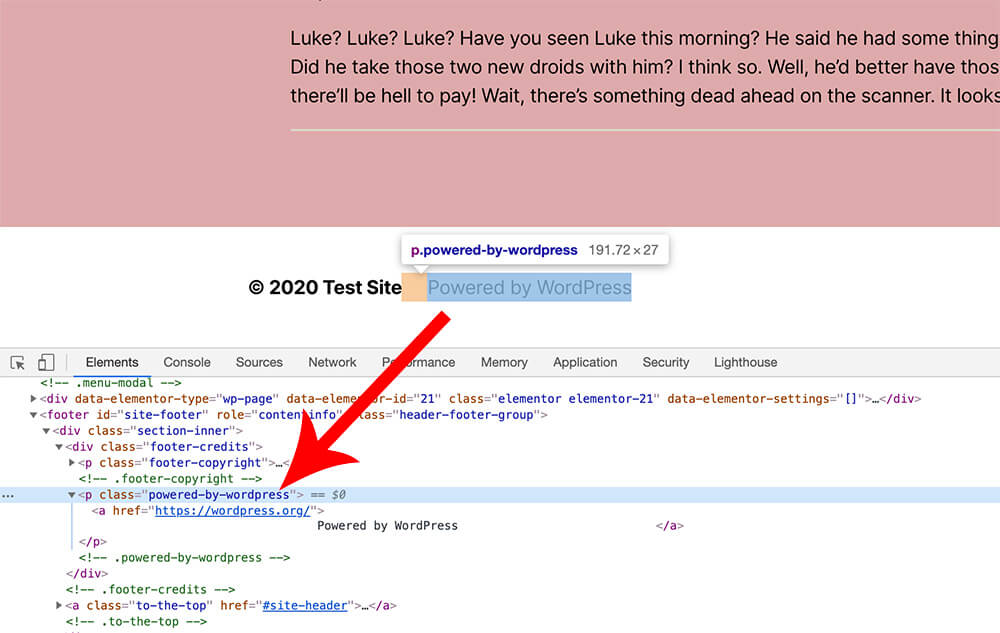
As you can see in the image below, the ‘Powered by WordPress’ is a paragraph with a powered-by-wordpress class.
If you got lost and couldn’t find what you were looking for, you can also try a chrome extension like CSS Peeper to expose the element class.
It is straightforward and friendly to use. All you need to do is install the extension and hover over your desired element to find its class.
Find it in the footer file
Once we found the desired element, it’s a good time to delete it from the footer.php file.
Navigate to Appearance -> Theme Editor and make sure you’re editing your desired theme from the list on the top right corner.
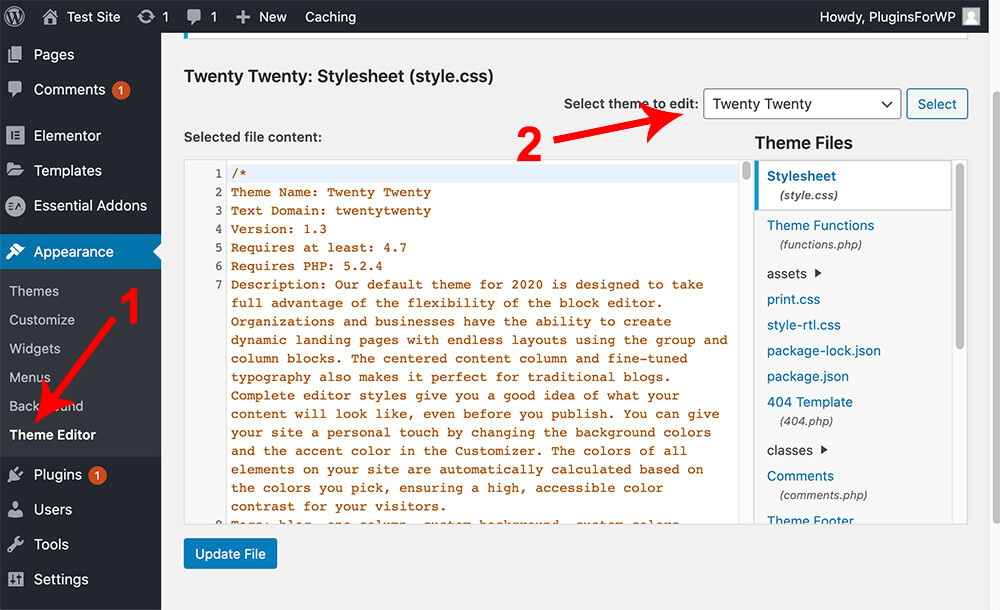
Please note that the changes will be overwritten on the following theme update if you edit the parent theme. Please make sure to install and work with a child theme.
Search and click on the footer.php file from the list of files on the right.
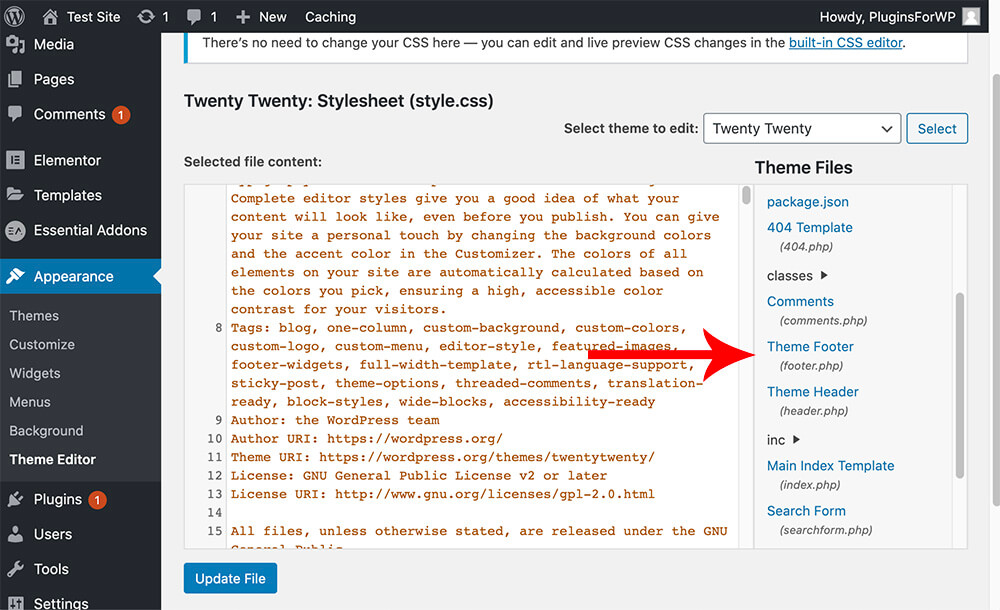
Then, target the item that we would like to change or delete.
Delete it
Let’s search for the element that contains the ‘powered-by-wordpress’ class and delete it.
Click on CTRL + F on Windows or Command + F on Mac and search for ‘powered-by-WordPress.’ If we inspected it correctly and found the right element, it should find it there in the footer file.
Before editing the footer, copy all the footer content and paste it into a note editor for backup. We can always recover and start again if we’re making any mistakes.
After finding the correct element, we can delete or modify it based on our needs.
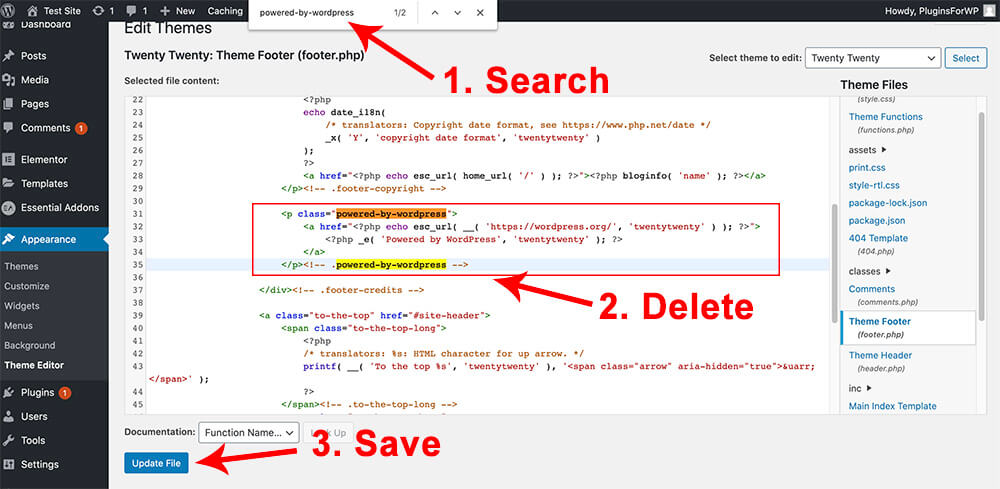
Once finished, save and revisit your website. If done correctly, the copyright text should be gone.

Hopefully, you find it reasonably straightforward to edit the WordPress footer file as said above.
If you managed to find the element class but couldn’t find it in the footer.php file it may be because it was generated by a function and not hardcoded into the footer itself.
Please don’t lose hope. In that case, we can still hide or edit it using some CSS rules.
Method #2: Edit the Footer With CSS
CSS rules are another great way to modify the whole or certain parts of the WordPress footer.
Like the previous method, we first need to inspect the footer class attribute and then apply the CSS. The good news is that you already know how to do it 🙂
To enter CSS into your website, click on the Customize option from your WordPress admin bar.

On this screen, based on your active theme, you’ll have some options (some themes have many and some just a few) on the left side.

Regardless of which theme you are using, all of them have the Additional CSS option.
Click on it and enter the code below:
.powered-by-wordpress {
display: none;
}
The CSS rule in the code above will hide the powered-by-wordpress element.
Please note that the code above will work for the twenty-twenty theme. If you have a different theme, you’ll need to change the powered-by-wordpress class with the class of the item that you’ll like to hide.
Another example of using a CSS rule could be to edit the footer background color.
As I showed you earlier, we will need to find the footer class or ID and apply a different color.
Once again, let’s click ‘Inspect’ on our footer and look for the footer ID or class.
We can see that the footer contains both ID and class attributes, and in that case, we are always going to target the ID.
Use the code below to paint the footer with a purple color in the Additional CSS screen.
#site-footer {
background-color: purpule;
}
Again, the code above targeted the ID #site-footer of the default theme. If you are using a different theme, you’ll have to find the ID or the class of your themes’ footer.
You can also specify a unique color by its hex code. Read our how-to change link color in WordPress article and learn how to find the hex code.
Method #3: Footer and Theme Customization
The theme customization screen provides us with many options to customize our footer section.
Unlike the other two methods above, this way is more theme-dependent.
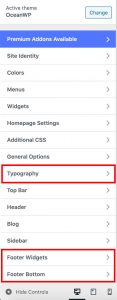
Some themes, such as Hello by Elementor, give you very minimal options in the customization screen. Other themes, like oceanWP, will provide you with many customization options to change the footer layout. Some options are the colors, text size, copyright text, and much more.
Change the footer layout and the copyright text from the footer tab when available. Style-related options like colors or text size can be found in the typography tab.
The number of customization options does not reflect the quality of the theme. More doesn’t always mean better. Many themes will let you build a custom footer using a page builder like Elementor.
This example will use the oceanWP theme because it comes preloaded with many options to edit the footer.
If, for example, we would like to change our footer background color, navigate to the Footer Bottom option, and change it there.
We will have many options to change the footer background color or text color to any color we want.
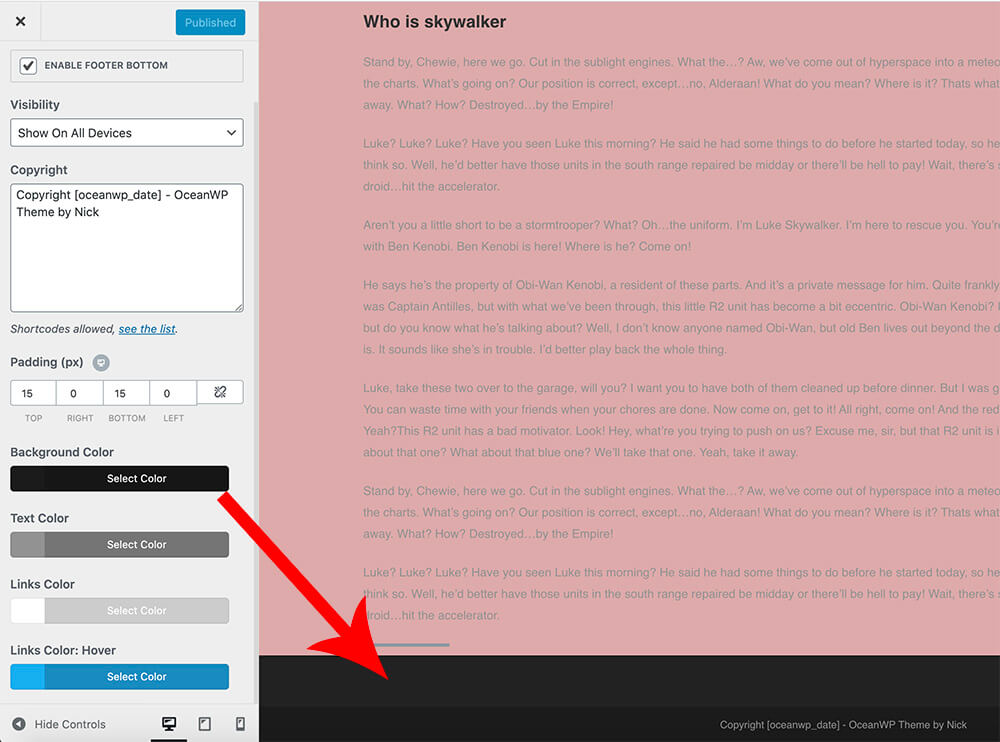
Once satisfied, save and revisit your website to verify that it was changed successfully.
Method #4: Edit Footer Widgets
Widgets are blocks of content placed on various parts of your website. The most common sections to hold widgets are the header, sidebar, and footer.
Not all footers will have the option to place widgets in them, but the majority will. I tested many themes during my years as a developer, and I only ran into two that didn’t have that option.
To see if the option exists for your theme, navigate to Appearance -> Widgets.
On the left side, you’ll have all the available widgets that you can use, and on the right side, the locations where you can display the widgets.
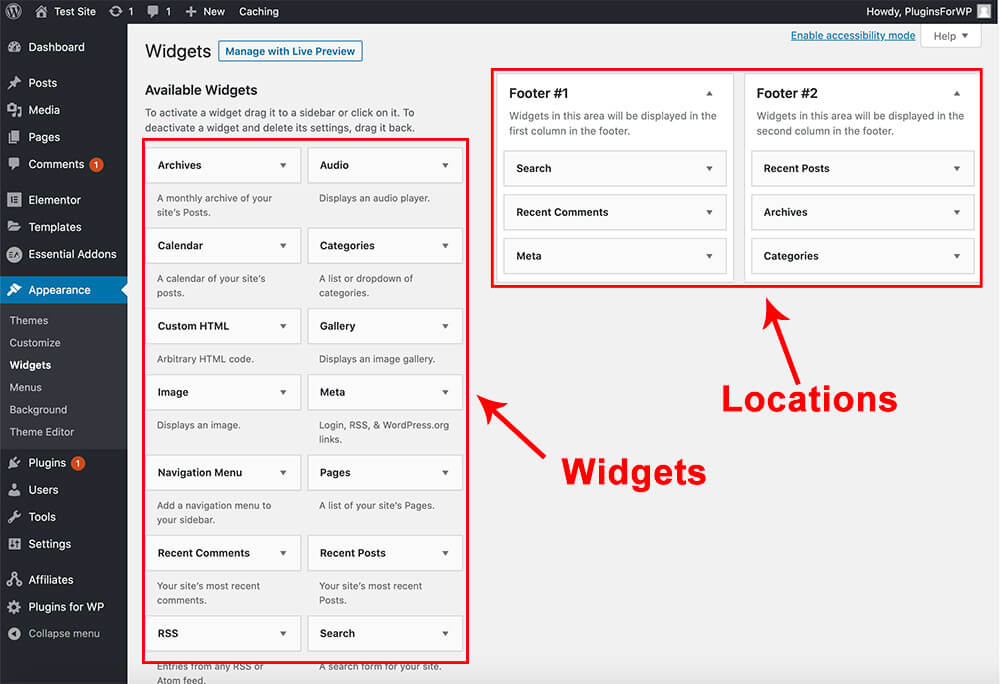
The image below shows that our default twenty-twenty theme has a footer with two widgets columns.
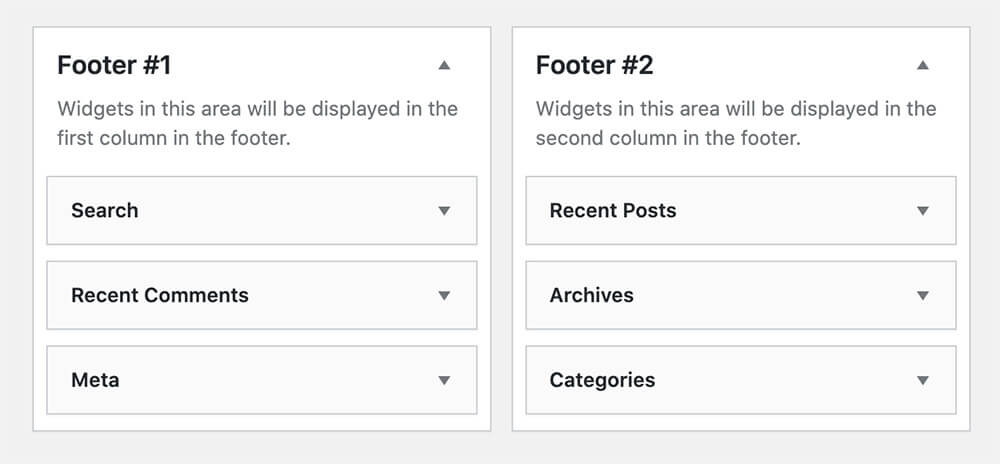
We can now drag many widgets as we want into or out of the widget column and re-organize their order by dragging them up or down inside the column.
In this example, I display three widgets in the left column and three widgets in the right column.
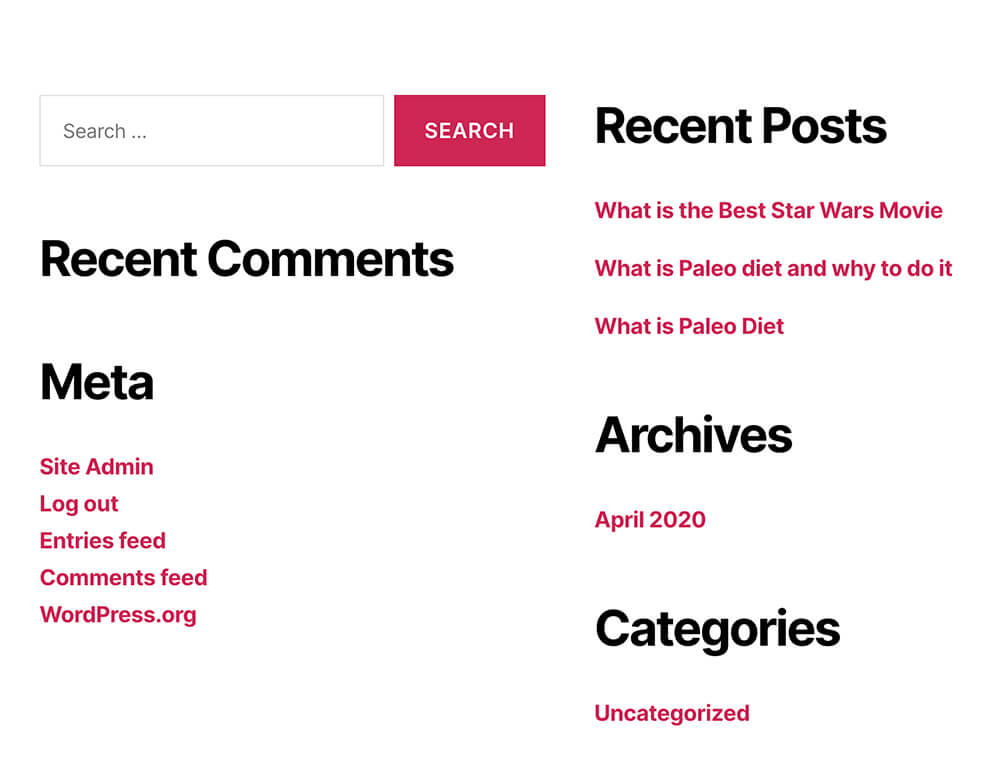
The website now displays all the widgets in the correct order as we set it up above.
More Ways to Edit the Footer
The methods above are the most common ways to design the footer, and they should work with most themes.
Today, users have a high demand for editing various parts of their theme without any single line of code.
The good news is that it’s possible. Visual drag-&-drop page builders such as Elementor or Divi will let you do that. If you haven’t built your website yet, I recommend you go that route.
The theme builder feature of Elementor will enable you to design a footer from scratch and display it instead of your default theme footer.
If you already have a live website and don’t want to install a page builder just for one section, I hear you.
There are many plugins in the WordPress plugin repository to help you edit your website’s footer without coding.
We recommend you go through some of them and explore how they can help you achieve the tasks you want.
Feel free to install some of them on your website and do some experiments if they help you. Good. If they didn’t, delete them and try different ones.
Conclusion
This article taught you how to edit the footer of your WordPress website in a few different ways.
If you need a custom CSS rule for your theme’s footer, leave us a comment, and we will provide it for you.
Also, make sure to subscribe to our YouTube channel and like our page on Facebook.