Have you ever needed to add a drop-down list to your Elementor website but didn’t know how?
A drop-down box is an efficient way to direct visitors to act by choosing one of the list’s options.
This article will show you how to create a drop-down list box and display it with Elementor.
When to Use the Drop-Down List Box
The idea of using a drop-down list comes in handy in a funnel-like structure to encourage visitors to choose a single option out of many.
For example, the WooCommerce plugin uses the dropdown select box in their product pages to display multiple options.
When customers visit the page, they’ll need to expand the list box with the variable options and select the option that fits them best.
Another typical case for using the drop-down list, as we did and many more sites, is on the contact us page.
Because our visitors are contacting us for various reasons, we created a dedicated contact form for each department.
Before creating a new support ticket, you’ll need to select the subject you need help with, and a contact form will be displayed based on your selection.
A drop-down list menu is an innovative and effective way to maximize productivity and offer our best support.
How to Create a Dropdown List in Elementor
Although Elementor doesn’t have a native widget to add a dropdown list box, we can still create it by installing an extension like Unlimited Elements or with HTML.
Because an Elementor extension will add many extra code files and stylesheets, it will be better practice to use the HTML method instead.
Creating a dropdown list is a couple of steps process made by these components:
- First, the HTML structure – to enter the different selecting options.
- Adding JavaScript – to control what will happen after selecting one of the options.
Combining the HTML structure with JavaScript is optional, but I can’t think of a scenario where only use the dropdown box by itself.
Create the Dropdown HTML Code
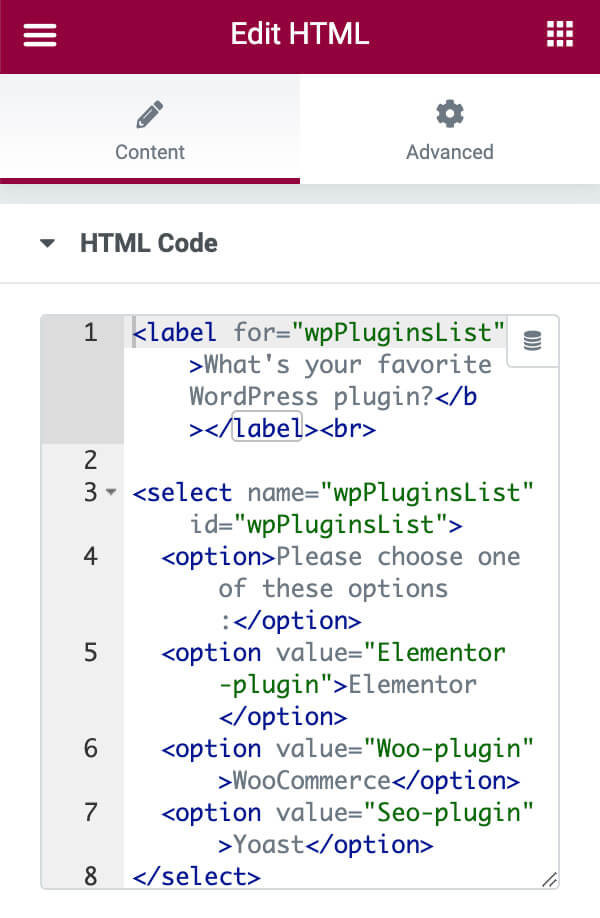
The <select> tag and a nested <option> tag for each list option assemble a drop-down navigation list.
In addition, we can add a <label> tag before the code to add a title to the list.
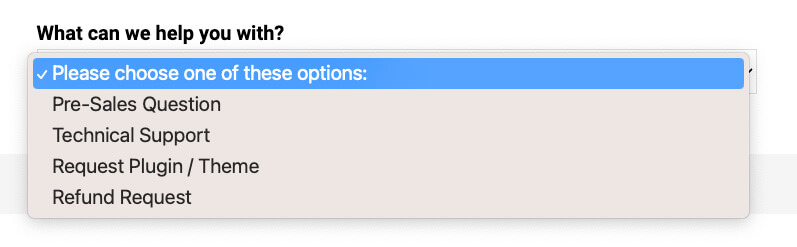
For example, to display an options list of the best WordPress plugin names, we will use the code below:
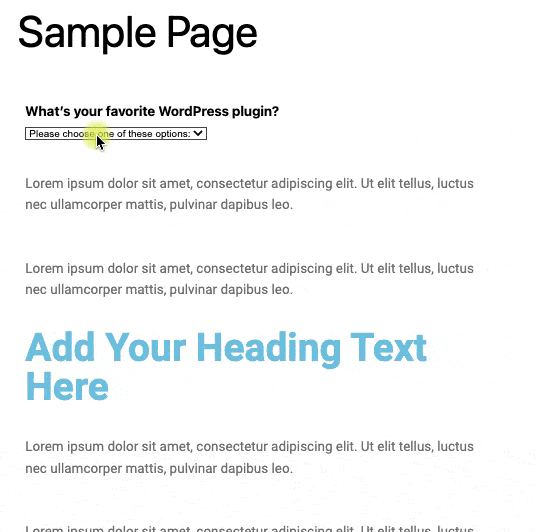
<label for="wpPluginsList"><b>What's your favorite WordPress plugin?</b></label><br>

<select name="wpPluginsList" id="wpPluginsList">
  <option>Please choose one of these options:</option>
  <option value="Elementor-plugin">Elementor</option>
  <option value="Woo-plugin">WooCommerce</option>
  <option value="Seo-plugin">Yoast</option>
</select>
The name attribute assigned to the elements is needed to reference the form’s data after submission, and the id attribute is used to associate the list with the label.
The HTML structure above will render this dropdown list:
Please note: the for attribute value of the <label> element and the id attribute of the <select> element should match each other.
You can copy the exact code above or create a similar one with a code editor app like Visual Studio Code.
Once created, click on the edit with Elementor button to launch the visual editor, and drag the HTML widget to your desired location.
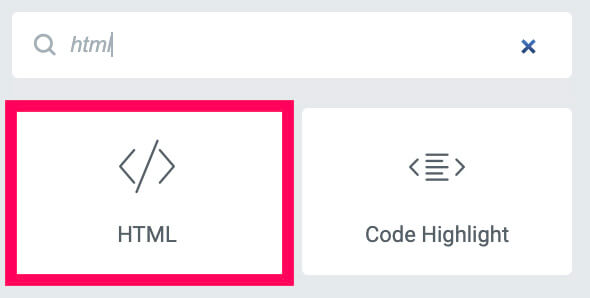
Then, paste the code inside the HTML widget and save the changes.
After saving, visit the live page and click on the dropdown list to ensure it’s working as expected.

If you only need the list, no more actions are required. However, add JavaScript if you want to trigger a movement after selecting an option.
Add the JavaScript Code
As mentioned earlier, Javascript is essential when creating a drop-down list element.
Initially, the code will watch for the visitors to select an option and react with an action.
The most common uses of the JS code in a drop-down box scenario are to scroll to the selected section or display it. Once you choose an option, you’ll be scrolled to the area assigned.
Regardless of the action you would like to perform, the process is ideally the same, and you’ll need to match the section ID to the value attribute text of the <option> tag.
For example, one of the value attributes of the option tags above is equal to the ‘Elementor-plugin‘. Therefore, I’ll assign the same value as an ID to the desired section.
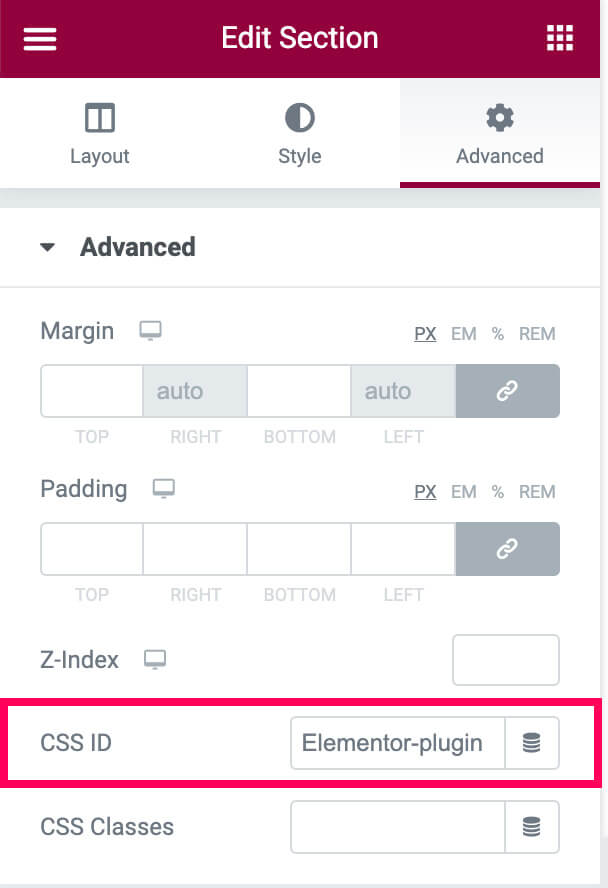
Create many sections as needed and attach their unique id value to match their corresponding option tag from the drop-down list.
Once done, choose what you would like to happen after selecting an option from the drop-down list. The JavaScript codes below will either scroll to the section, display it, or both.
Scroll to the Dropdown Selected Section
This first code will check the selected option’s value and scroll you down to the top of its matching section.
You can paste the code below using an FTP or inside the plugin itself, as we showed you in the how to add JavaScript to Elementor tutorial.
<script>
(function ($) {
$(document).ready(function () {
$('#wpPluginsList').change(function() {
$selectedValue = $(this).val();
$('html, body').animate({
scrollTop: $('#'+$selectedValue).offset().top - 25
},500);
});
})
})(jQuery);
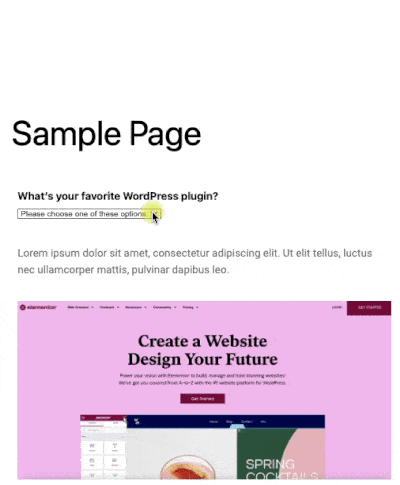
</script>Once saved, revisit the page and select an option from the drop-down box. If coded correctly, you’ll be scrolled to the correct section.
If that was your only intention, you now have a fully functional drop-down menu created with Elementor. However, keep reading if you want to hide the sections and display them based on the user’s selections.
Show / Hide Sections Based on the Dropdown Selected Value
The code below will hide all the sections on the page load and only display a single one based on the user’s choice from the dropdown list.
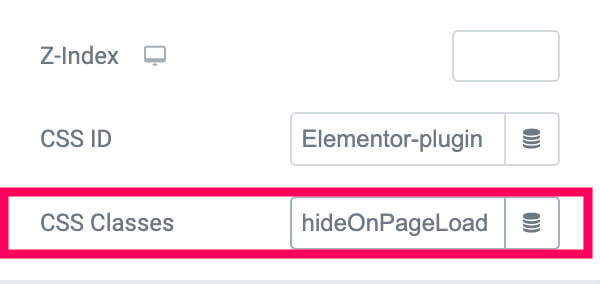
Because we only want to hide specific sections, we need to assign a class to all the relevant departments to differentiate them from the other areas (that we don’t want to hide).
To do that, go to the Advance tab of all the relevant sections that are part of the dropdown list, and populate them all with the same class, for example, hideOnPageLoad.
Then, use the code below:
<script>
(function ($) {
$(document).ready(function () {
  $('.hideOnPageLoad').hide();
  $('#wpPluginsList').change(function() {
    $('.hideOnPageLoad').hide();
    $selectedValue = $(this).val();
    $('#'+$selectedValue).toggle();
  });
})
})(jQuery);
</script>
Save the changes once again and test the drawdown feature to ensure it’s working as expected.
Neat right? How about combining both methods? Show the section and scroll to it.
Combine Both Methods Into One
Each of the codes above had its purpose, one was to scroll, and the second was to show.
We will combine both codes this time, so choosing a value from the drop-down list will display the sections and scroll us to it.
Please remember to follow the method above and assign the same class to all desired elements.
<script>
(function ($) {
$(document).ready(function () {
  $('.hideOnPageLoad').hide();
  $('#wpPluginsList').change(function() {
    $('.hideOnPageLoad').hide();
    $selectedValue = $(this).val();
    $('#'+$selectedValue).toggle();
    $('html, body').animate({
        scrollTop: $('#'+$selectedValue).offset().top - 25
    },500);
  });
})
})(jQuery);
</script>
When finished, the code’s final behavior will display and scroll to the selected element.
Conclusion
This article showed you how to create a dropdown menu with Elementor by using HTML and JavaScript.
Although Elementor doesn’t have a native dropdown widget, we could still achieve it with some code.
Leave us a comment and tell us if you have any questions about the process.
Also, make sure to subscribe to our YouTube channel and like our page on Facebook.