
Changing the website’s header is a popular design approach.
Because the header typically contains the website’s most valuable links, it is essential to keep it visible as much as possible.
However, in some cases, you’ll want to change the header’s structure or design on scroll to compliment the page.
The changed header can be a different background color, elements order, minimized height, or anything else.
This tutorial will show you how to change the Elementor header when scrolling the page.
How to Change the Header in Elementor
Changing the website header requires combining a few steps, such as jQuery and CSS.
Change Elementor header by following the steps below:
-
Create a header template with Elementor Pro.

-
Design the default header as the SECOND section and the fixed header as the FIRST section.

-
Publish the header template on your desired pages.

-
Add the jQuery and CSS codes in the Elementor Custom Codes feature.
-
Test that the header changed on the scroll.
Once we understand the steps, let’s dive in and see how to change the header.
Create a Header Template
Creating a header template in Elementor allows you to design a custom header for your website. Thanks to Elementor’s user-friendly, drag-and-drop interface, the process is straightforward.
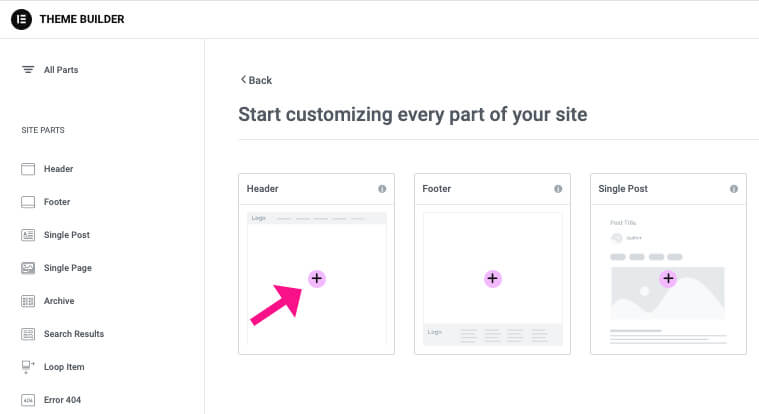
From your WordPress dashboard, go to Templates > Theme Builder.
In the Theme Builder, you’ll see different parts of your website that you can design. Choose the header.
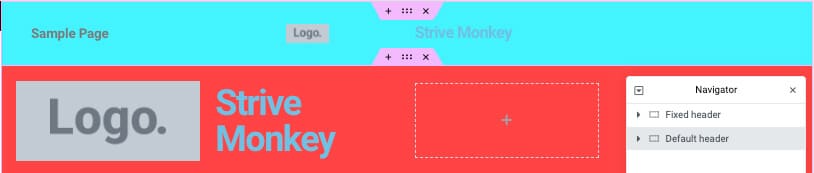
Once the Elementor editor screen is loaded, choose pre-made templates or build them from scratch.
The fixed header that should be displayed at the top of the page will be the first section, while the default header will be the second section.

Prepare the Replace Header
Once we finish designing both headers, we can proceed to the next step and assign an ID.
We need to use jQuery (or JavaScript) to manipulate the visibility of the replacing header. To do that and differentiate between the two headers, let’s assign a unique ID to the fixed header.
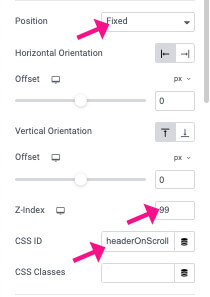
So, click on the changing header section, navigate to the Advanced tab, and enter headerOnScroll inside the ID field.
Then, under the same tab, change the Position to Fixed and fill the z-index field with a high value like 99.
A high z-index value will ensure that the header will be displayed on top of the other sections of the page rather than behind them.
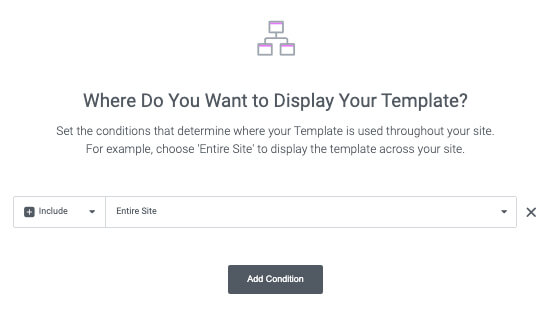
Once done, publish the header template and set the displaying conditions based on your needs.
Applying the jQuery to Change the Header
Changing a website header on scroll typically involves using JavaScript (or a JavaScript library like jQuery) and CSS to modify the header’s style or content based on the page’s scroll position.
The general idea is to listen for the scroll event on the window or document, check how far the page has been scrolled, and then apply changes to the header based on that scroll distance.
I already created the jQuery and CSS codes to simplify your life.
To apply the code, navigate to Elementor -> Custom Codes -> Create new.
Then, please copy the code below and paste it inside the custom code screen.
<script>
  (function ($) {
  $(document).ready(function () {
    var headerOnScroll = $('#headerOnScroll');
	var headerOnScrollHeight = headerOnScroll.height();
	headerOnScroll.css( 'transform','translateY(-'+ headerOnScrollHeight +'px)' );
	$(window).scroll(function() {
		if($(this).scrollTop() > 300){
			headerOnScroll.addClass('showNewHeader');
		}else {
			headerOnScroll.removeClass('showNewHeader');
		}
	});
  });
  })(jQuery);
</script>

<style>
#headerOnScroll.showNewHeader {
transform: translateY(0) !important;
}
</style>
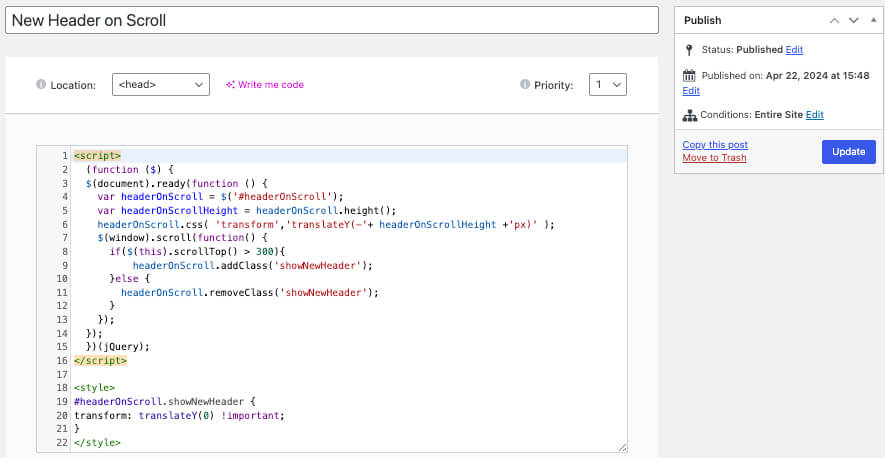
You can change the 300 number in the code to control when the new header is displayed when scrolling down from the top of the page.
Once you’ve completed this, save the custom code and execute it on all pages (or all the pages where the header is presented).
Then, visit your website and ensure the Elementor header changes successfully.
Changing Header Troubleshooting
In most cases, with most themes, the steps we took up to this point will ensure that the fixed header is hidden on page load and behind the default header.
However, if on page load, you can still see both headers or a glimpse of the fixed header before it disappears, you can fix it in two ways:
- Ensure the default header has a higher z-index value than the top header. For example, if we set the z-index value of the top header to 99, we should set the default header z-index value to 999.
- Change the custom code executing location from the default
<head>tag to</body> - Endinside the custom code screen in Elementor.
Once you corrected the above two possible issues, save the changes and retest the header to ensure it changes on scrolling.
Conclusion
This tutorial showed you how to change the header in Elementor easily.
There are several reasons to change the header, some design-related and others practical. Whatever the reason, this tutorial showed you how to do it.
Also, make sure to subscribe to our YouTube channel and like our page on Facebook.