Introduction
Last week, we learned how to use wp-cli to run commands for your WordPress install without using the GUI, and how to script commands to create batch operations. This week, we’ll learn how to create custom wp-cli commands that can run your own PHP code and do anything you want.
Creating a WordPress plugin
To start, we will create a simple WordPress plugin that will contain all of our code. You should first pick a name for your plugin. It’s advisable to use your company or organization name as a prefix. For example, my-company-cli-commands could be a good name for a company called My Company. Once you’ve decided on the name of your plugin (make sure there are no spaces or special characters not allowed in directory / file names), create a directory with that name in the WordPress plugins directory and switch to that directory:
mkdir my-company-cli-commands
cd my-company-cli-commands
Inside this directory, you’ll want to create the main PHP file. It should have the same name as the directory with a .php extension. In our case, this will be my-company-cli-commands.php. You can use any editor for this. Once you’ve created the file, we need to add a PHP comment block at the top. Comments in PHP are generally ignored by PHP, but in the case of WordPress plugins and themes, this giant comment block at the top of the main PHP file is used by WordPress to obtain the metadata (name, version, compatibility, URLs, etc.) for the plugin. Here’s what it’ll look like for our new plugin:
<?php
/**
 * My Company CLI Commands
 *
 * @package           My Company
 * @author            My Company
 * @copyright         2020 My Company
 * @license           GPL
 *
 * @wordpress-plugin
 * Plugin Name:       My Company CLI Commands
 * Plugin URI:        https://my-company.com/
 * Description:       Adds wp-cli CLI commands to WordPress.
 * Version:           1.0.0
 * Requires at least: 5.0
 * Requires PHP:      7.4
 * Author:            My Company
 * Author URI:        https://my-company.com/
 * Text Domain:       my-company-cli-commands
 * License:           GPL
 */
Comment block explained
If you’re writing an actual plugin, you would replace the names and URLs with your own. The version and license are up to you, though if you want to distribute your plugin later on wordpress.org, licensing it under the GPL license is necessary.
The Requires at least field is the minimum WordPress version you will support. Currently, the major WordPress version number is 5. Here, we are targeting version 5 and above. Depending on the features of your plugin, you may need to require a different WordPress version.
Likewise, the Requires PHP field is the minimum PHP version your plugin will support. Here, we have set it to 7.4. With the release of PHP 8 last year, it’s recommended that this be at least 7.3. All older versions are now obsolete and no longer supported for quite some time. Unfortunately, a lot of people are still running some version of PHP 5 in production. This is unfortunate and dangerous from a security standpoint. Not to mention slow (PHP 7 had a 2-3x speed increase over 5 and PHP 8 will be faster than 7). But sometimes, older versions need to be supported. If writing a plugin for the widest audience, supporting PHP 5 is still necessary. We are hopeful that WordPress will move to PHP 7+ in the future and also start supporting PHP 8 soon.
Now that we have the plugin, you can log into your admin site and activate it. Or activate it with wp-cli directly as we showed last week. It won’t do anything yet, but it is a real plugin.
Your wish is my command
Now let’s add some code:
WP_CLI::add_command( 'myco do something',
	function () {
		WP_CLI::line( 'Starting...' );
		try {
			// Call your custom code here
		} catch ( \Throwable $e ) {
			WP_CLI::error( $e->getMessage() );
			throw $e;
		}

		WP_CLI::success( "Success!" );
	}
);
This is the basic scaffolding for the command. You can add as many commands as you want this way. In this case, the command that you will run to invoke this code is:

wp myco do something
Remember to run that from inside the WordPress directory for it to work. Give it a try now. If it was successful, it should show:
Starting...
Success!
The WP_CLI::line() function call just prints some information to your terminal, in this case, a message indicating that your command has started. The WP_CLI::success() call tells wp-cli that you have finished successfully (returns a 0 exit code to the shell for those that are familiar with Linux/BSD systems) and prints a message to the user indicating so.
If there is an error in your code, it will be caught by the catch block and the exception message will be printed to the console. The exception will be re-thrown. This will stop all execution and print a stack trace to help you see where and how the error was reached. This is extremely useful for debugging.
Your custom code
Now you have the scaffolding needed to add your custom commands. Once this executes successfully, you can add some code to replace the // Call your custom code here comment in the code above. I recommend you don’t just dump a bunch of code into this callback, but call another function or method. This way, the command is separated from the code that actually implements the command. It will be much easier to maintain and if you have a lot of commands, the implementation for each one can go in its own function, file, or class, depending on your preference. Here’s an example. First define a function to do something:
namespace MyCompany\CLI;

use WP_CLI;

class Commands {
	/**
	 * Run the "do something" command
	 */
	public static function doSomething() {
		// ...
	}
}
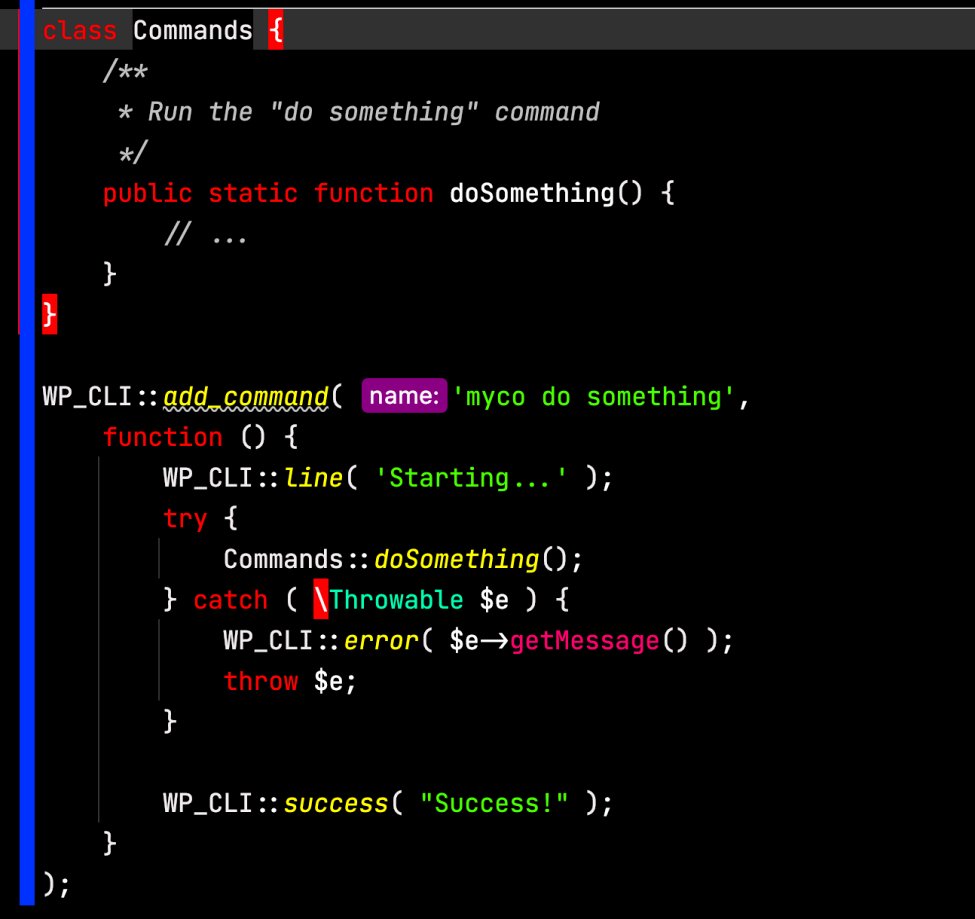
In this case, I’ve created a namespace for our code, MyCompany\CLI, and created a class called Commands inside to hold our function. You can just create a function by itself, but if you will have complex functionality, it makes sense to encapsulate it in a class.
Finally, I’ve created a public, static function called doSomething. Because it’s public, it’s callable from anywhere, and because it’s static, we don’t have to instantiate the class first but can call it directly. I also added a use statement so we can call commands from the WP_CLI class from within our namespace. Now we modify the original code to make a call to this function:
WP_CLI::add_command( 'myco do something',
	function () {
		WP_CLI::line( 'Starting...' );
		try {
			Commands::doSomething();
		} catch ( \Throwable $e ) {
			WP_CLI::error( $e->getMessage() );
			throw $e;
		}

		WP_CLI::success( "Success!" );
	}
);
Now, upon running the command, your code in Command::doSomething() will be ran. What that code does is up to you. You have access to the full WordPress API that any plugin does and can do anything you need. Perhaps you need to load some data from an external source, update the date on some blog posts, or call out to some functionality from other plugins. Anything is possible.
Conclusion
In this post, we learned how to create a basic WordPress plugin. We also learned how to use wp-cli to create our own custom commands that can run any PHP code inside this plugin. Instead of just running the commands that wp-cli provides, we can now extend its functionality and provide brand new commands that are custom tailored to our sites and our needs. In the future, we will look into some ideas for commands you can write to simplify management of your WordPress sites and add functionality that neither WordPress or wp-cli provides. This should be a good start for you to be able to add your own CLI commands or use CLI commands to trigger internal WordPress APIs or other plugins.
Also, make sure to subscribe to our YouTube channel and like our page on Facebook.